
How to Wire Addressable LED Strip Lights?
An addressable (SPI) LED strip has two power pads, V+ and GND, plus signal pads. Single-signal strips such as WS2812B have one data line (3 pins); dual-signal strips such as APA102 have data and clock (4 pins). To wire one:
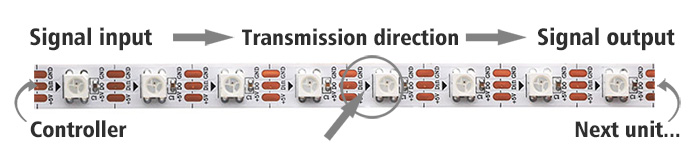
- Find the input end: the arrows on the strip point away from it, in the direction the data flows.
- Connect the controller DATA (and CLK on a 4-wire strip) to the matching pads, and join the grounds of the supply, the controller and the strip.
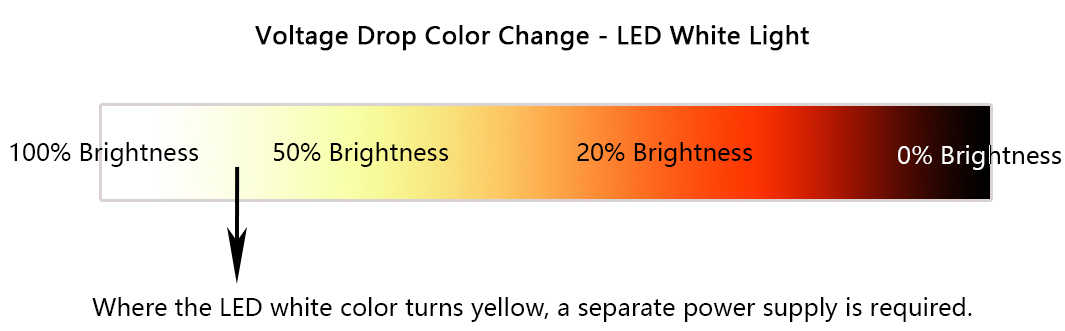
- Power the strip from the supply. For high-power or long strips, power the strip separately and add power where the brightness drops.
At SuperLightingLED we set up addressable LED strips and SPI controllers for home, shop and stage projects every day. Start with the wiring diagram that matches your strip, then use the sections below for controllers, installation, power and flicker.
Addressable LED strip wiring diagram (3-pin and 4-pin)
Count the pads at the cut mark. The number of signal lines decides which controller output you need:
| Strip type | Pads | Common ICs | Controller output |
|---|---|---|---|
| Single-signal (3-pin) | V+ (5 V, 12 V or 24 V), DIN (data), GND | WS2812B, WS2811, SK6812 | DATA and GND |
| Dual-signal (4-pin) | V+, CLK (clock), DAT (data), GND | APA102, SK9822, WS2801 | CLK, DAT and GND (4-wire SPI) |
| Breakpoint resume (4-pin) | V+, DI (data), BI (backup), GND | WS2815, WS2813, SK6813 | DATA and GND; BI to GND at the first pixel |
These diagrams are drawn by the SuperLightingLED engineering team. Wire colors follow our house convention: red V+, black V-/GND, green data. Click a diagram for the full notes in our LED strip wiring diagrams library.
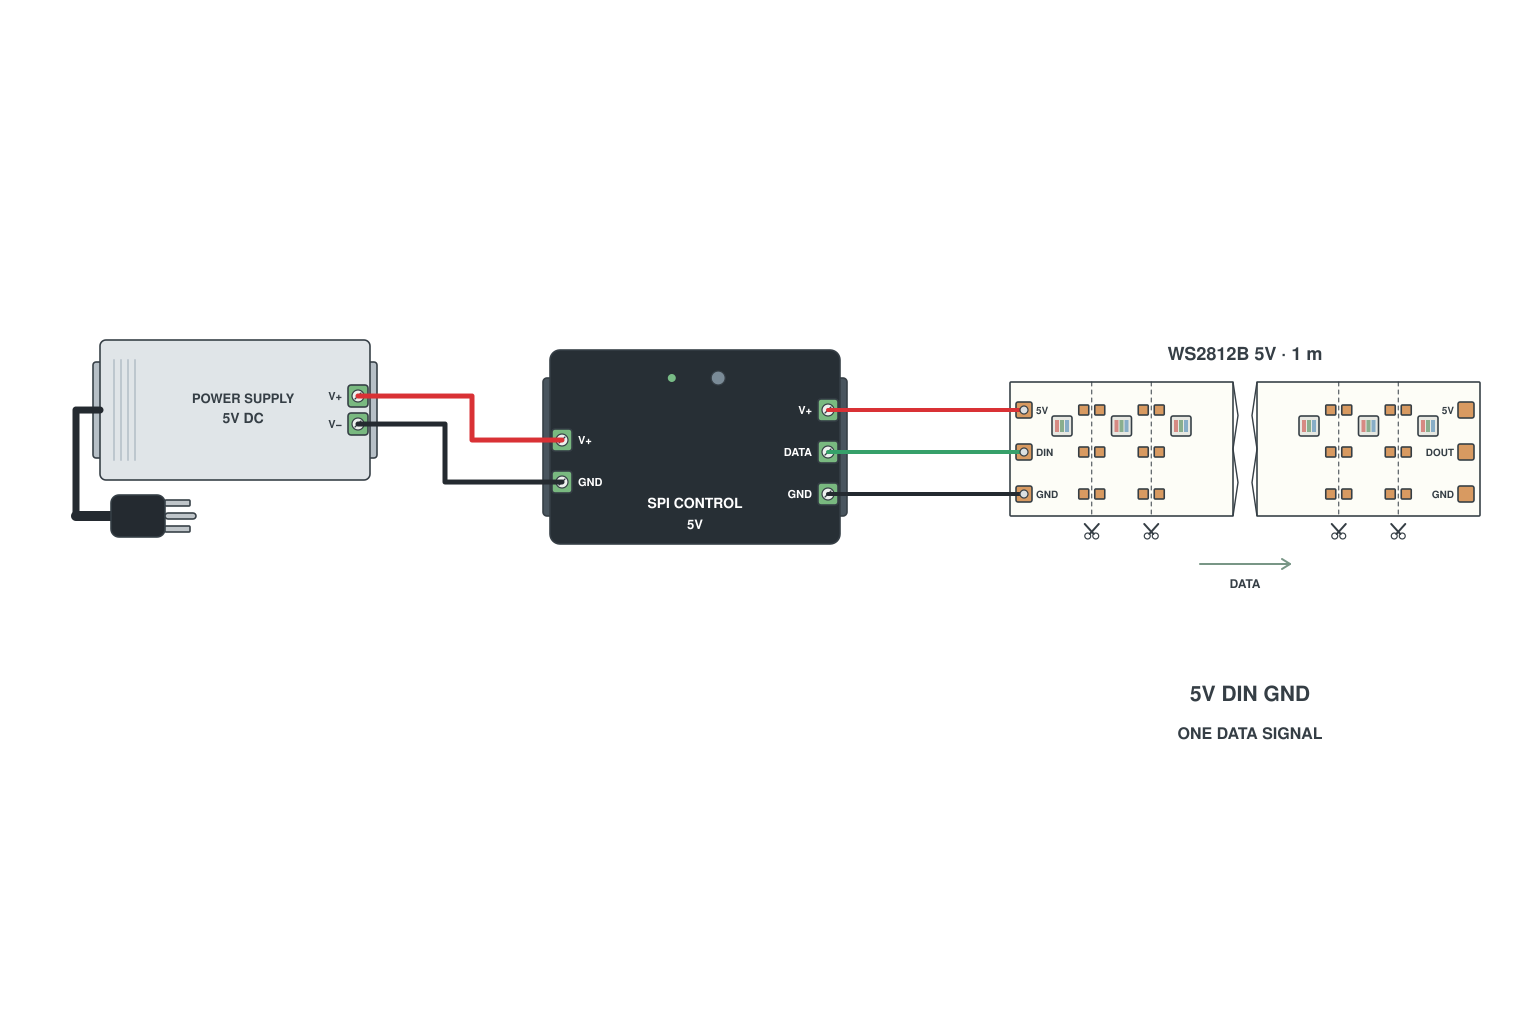
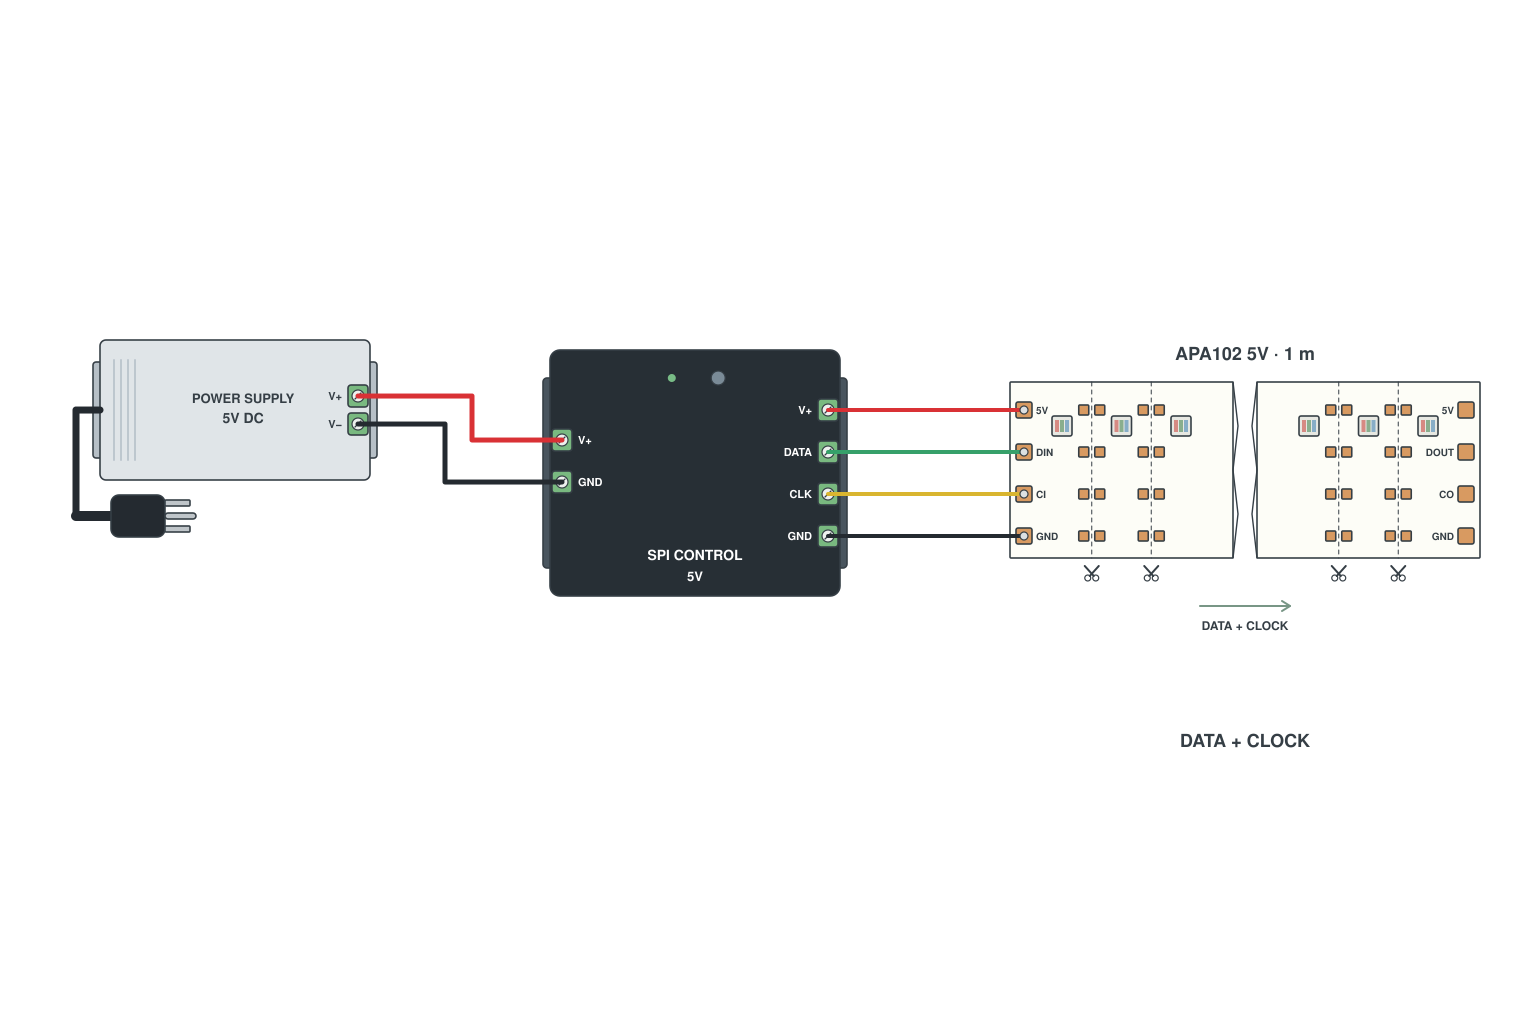
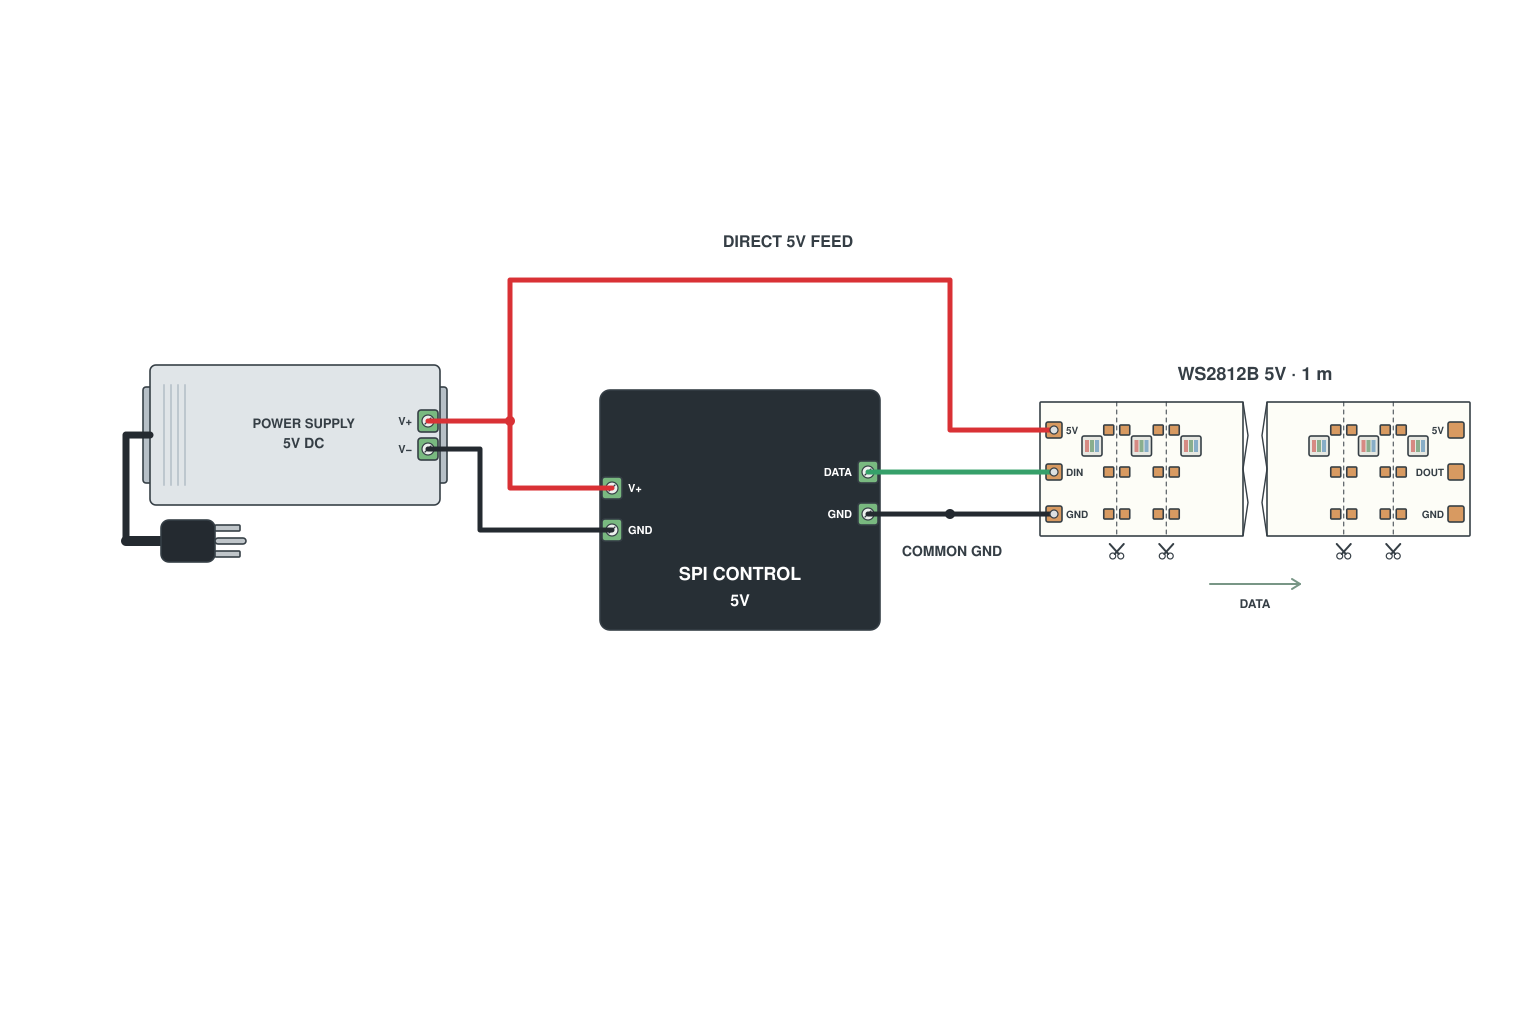
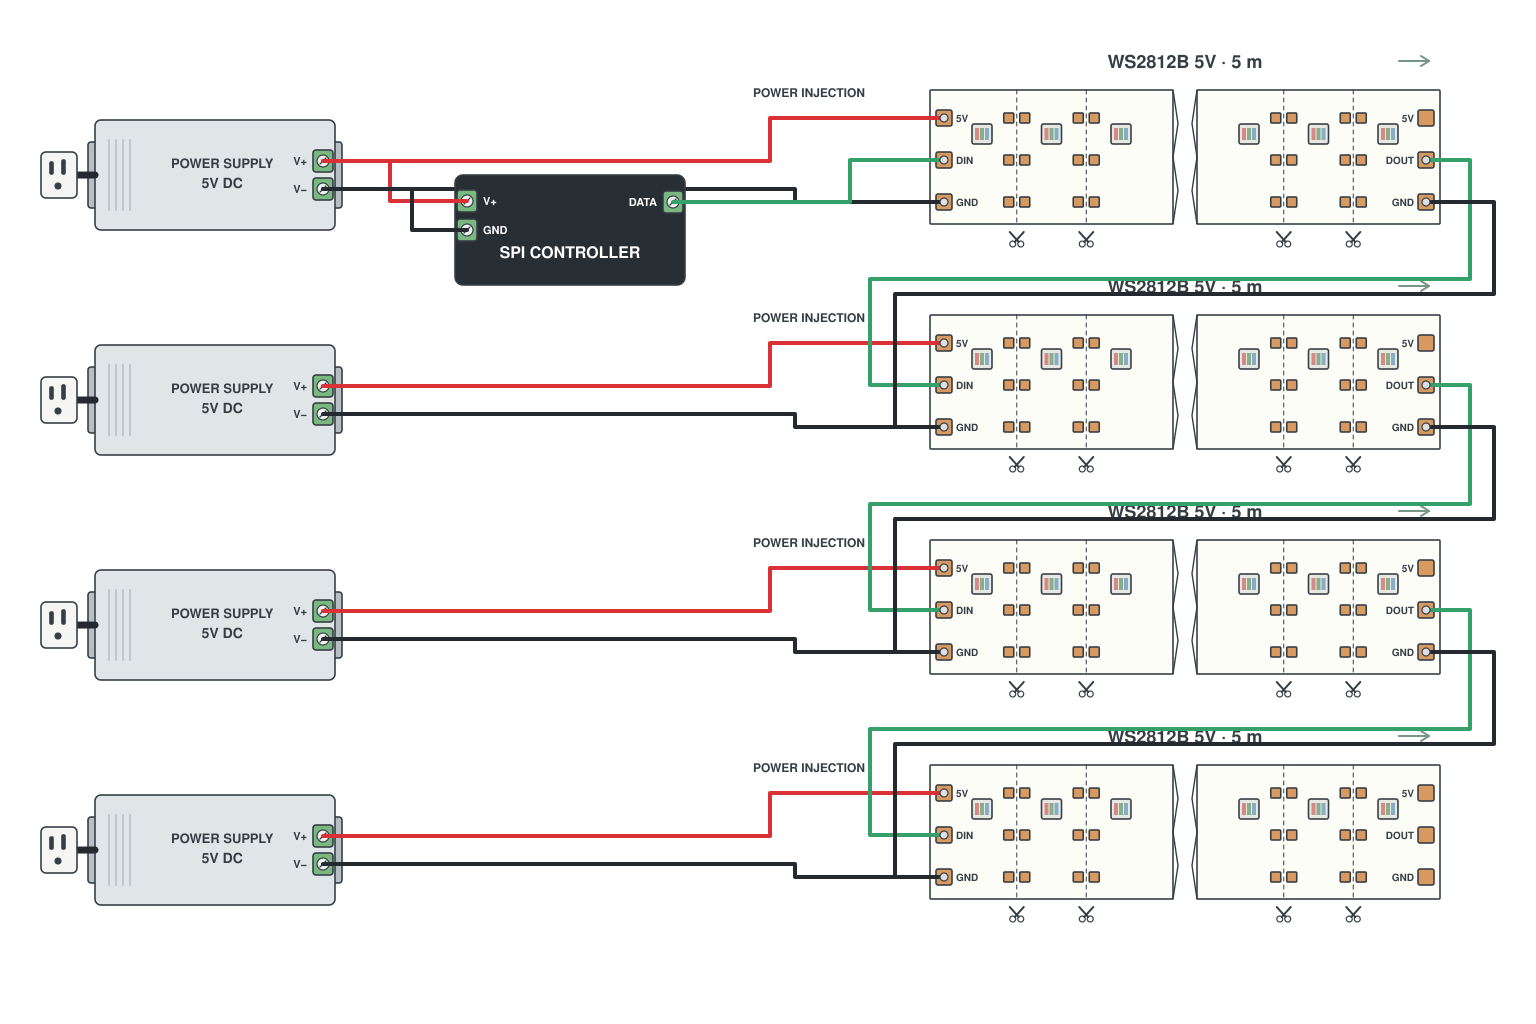
Buying connectors for a strip you already have? See which connector fits 2-pin to 6-pin strips.
The addressable led strip lights(sometimes it is called programmable led strip lights, SPI digital led strip lights, or led pixel strip) means that it can have multiple colors on the same strip, unlike others, the entire strip must be the same color. And all this comes from the control of IC. One IC can control one LED light, which is called individually addressable led strip lights, and one IC is one pixel. If one IC controls multiple LED lights, then these multiple LED lights are one pixel, their brightness and color will change together. The brightness and color of each IC can be individually controlled, allowing you to produce amazing and complex effects in a simple way.
| Total pixels of addressable led strip = Pixels(ICs)/meter * Length |
The positive and negative poles are power lines, and the others are signal lines. For signal transmission, the signal line should not be missed. The arrows of the led strip indicate the direction of data flow. If the SPI controller is not installed on the data input side, it will not work. If the addressable led strip needs to be powered separately, the power line should be connected to the power supply. Don't worry about how to judge whether the addressable led light strip needs a separate power supply, it will be discussed in detail in the following content.
| Addressable LED | V+ (Red) |
V- (Black) |
Signal 1 (Green) |
Signal 2 (Blue) |
Address |
VCC |
GND |
DAT |
|||
VCC |
GND |
DAT |
CLK |
||
| VCC | GND | DAT | Backup | ||
| VCC | GND | A/DMX+ | B/DMX- | PI |
To fully understand the addressable LED strip lights: Ultimate Guide to Choosing the Right Addressable LED Strip
 Addressable LED strip lights wiring diagram
Contents
1. What controller to use for your addressable led strips?
• How to solve the problem of insufficient pixels of the SPI controller?
2. How to install addressable led strip lights?
• How to connect the 3-pin JST connector to the Breakpoint Resume LED strips?
3. How to judge if the addressable led strip lights need to be powered separately?
• What is voltage drop? How to solve the voltage drop?
• LED Density and Voltage Drop
• How to power addressable LED strips and SPI controllers using different voltage power supplies?
4. How to wire long addressable lighting strips?
5. How to solve the LED light flickers?
What controller to use for your addressable led strips?
SPI controller
The SPI controller supports WiFi, RF, Bluetooth, Music, and Voice control(Alexa and Google Assistant). Built-in hundreds of well-written programs, users can choose the type through their hobbies, and use them for home and simple lighting projects that don't know how to program.
Advantages: Many procedures, low difficulty.
Disadvantages: Unable to choose a special program.
Please pay attention to two points about the SPI controller:
1) Whether the SPI controller can control the IC type of your addressable led strip.
How to solve the problem of insufficient pixels of the SPI controller?
1) Change to an SPI controller with more pixels.
We have the SPI controller that can connect 4 addressable led strips or 8 led light strips in parallel, which combines the functions of the SPI controller and the SPI amplifier.
2) Add one or multiple addressable SPI multi-channel amplifier to amplify the pixels.
The SPI amplifier has a completely different function from the non-addressable led strip lights amplifier. The number of pixels of the SPI amplifier is amplified by multiple channels. For example, the SPI controller has 600 pixels built-in, and 8*600 pixels can be connected behind the 8-channel amplifier.
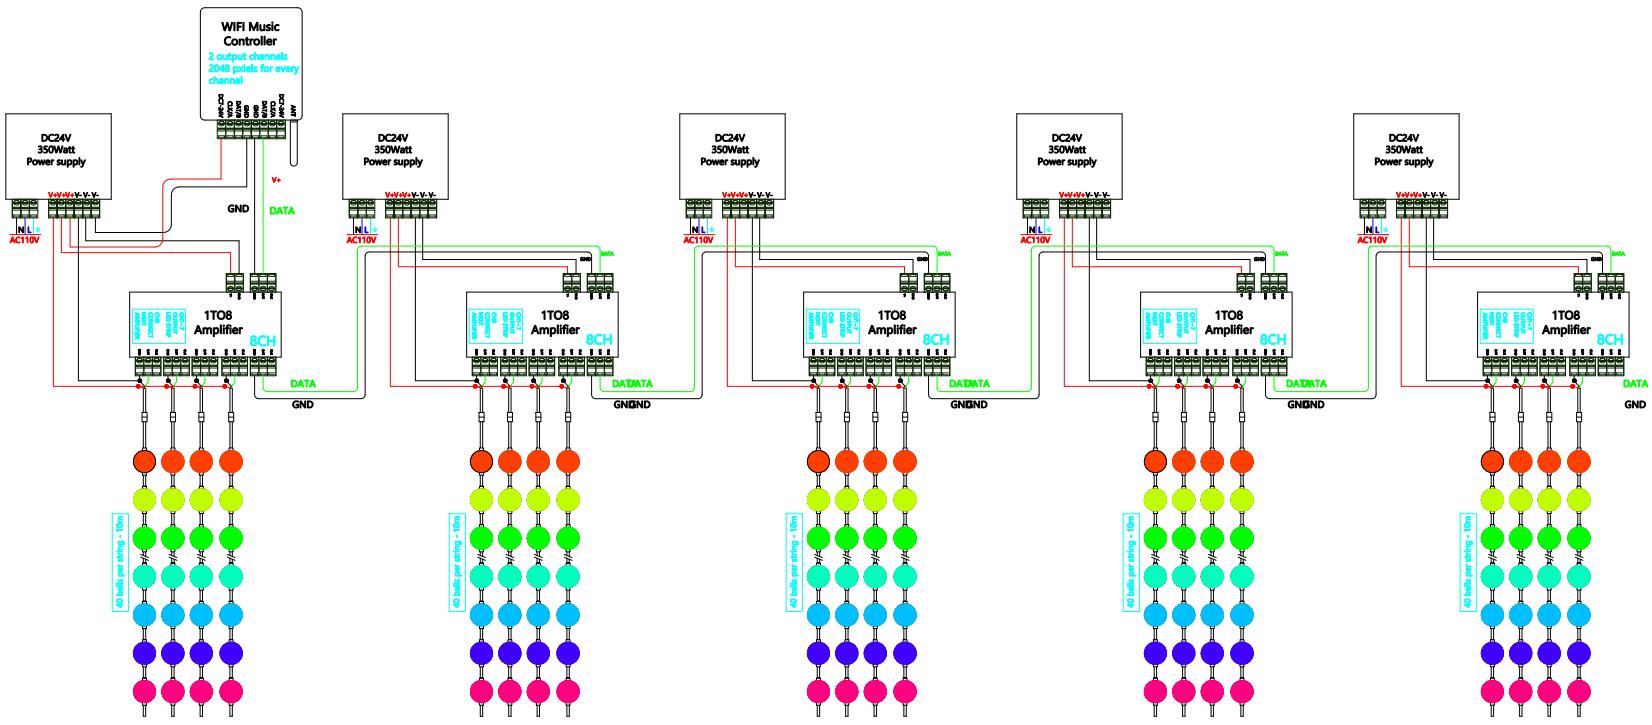
*LED Strip lights amplifier wiring diagram*
3) Use WIFI or RF function to wirelessly synchronize multiple SPI controllers.
The grouping function should be controlled by a mobile phone, and there are single-channel controllers and dual-channel controllers.
Programmable controller
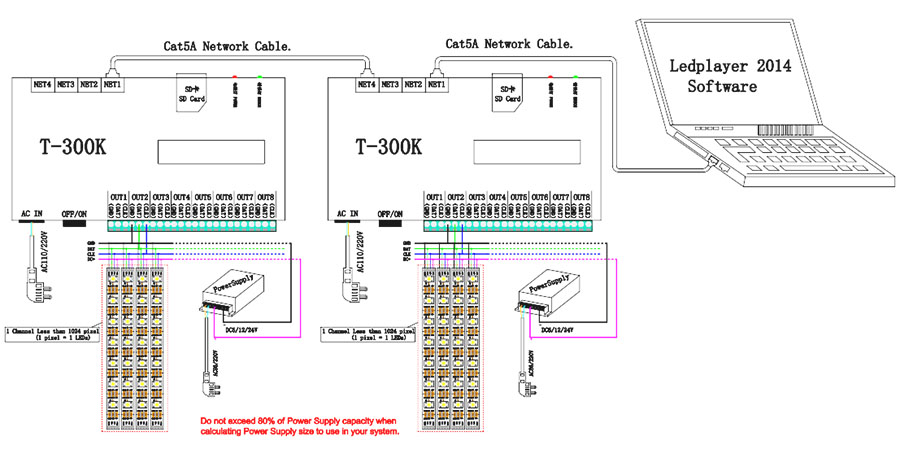
*T-300K LED Strip lights wiring diagram*
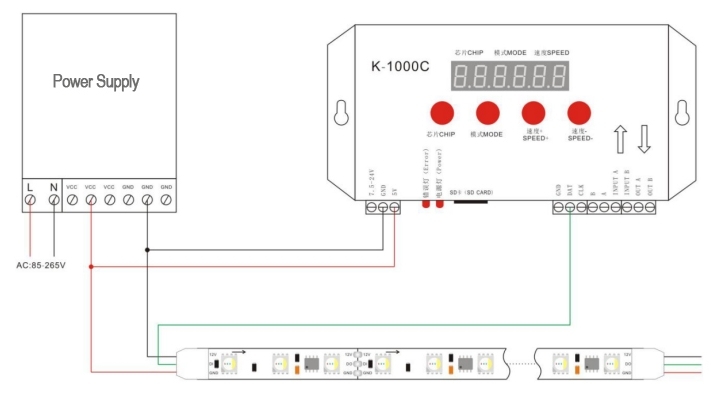
*K-1000C LED Strip lights wiring diagram*
Art-net DMX controller
Disadvantages: Need to be able to use Mardix software.

*BC-204 DMX LED Strip lights wiring diagram*
SPI decoder
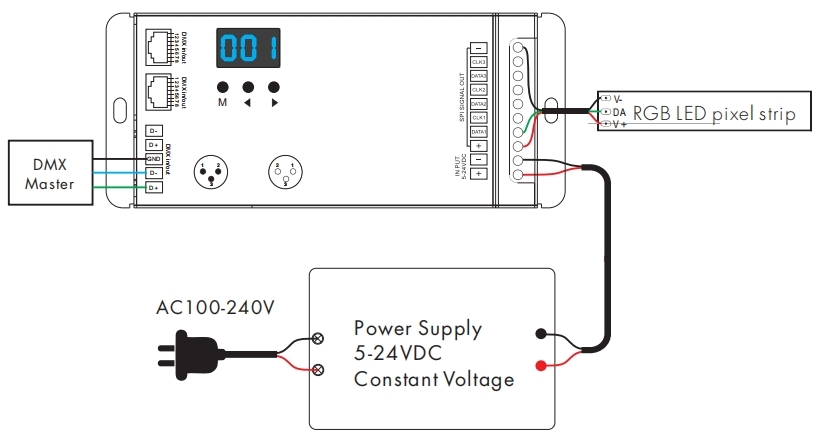
*DSA Decoder LED Strip lights wiring diagram*
Open source development board
The open source development board is represented by Arduino UNO and Raspberry PI. The development board is small and easy to use. It can be used in the complex environments and DIY projects, but it needs to know how to program.
How to install addressable led strip lights?
Connection method one:
If the power supply, the SPI controller, and the addressable led strip are not in the same place, we usually choose to extend the distance between the light strip and the SPI controller, but this has the disadvantage that the SPI signal will attenuate. This signal attenuation can cause LED lights to flicker when running long addressable led light strips. The problem of SPI signal attenuation can be perfectly solved by installing a mini amplifier at a point in front of the light strip. We will mention in detail about the light strip flickers later.
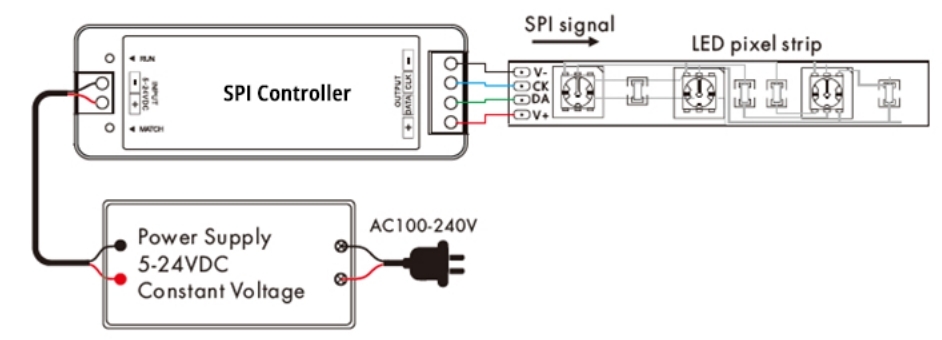
*SPI LED Strip lights wiring diagram with 5m*
Connection method two:
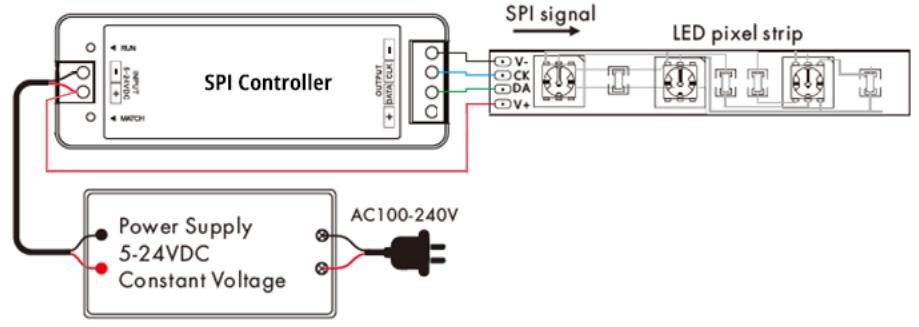
*SPI LED Strip lights wiring diagram with 10m*
How to connect the 3-pin JST connector to the Breakpoint Resume LED strips?
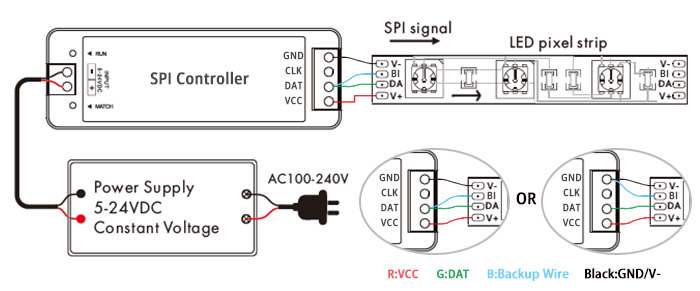
Addressable led strip lights separate power supply wiring diagram
How to judge if the addressable led strip lights need to be powered separately?
What is voltage drop? How to solve the voltage drop?
LED Density and Voltage Drop
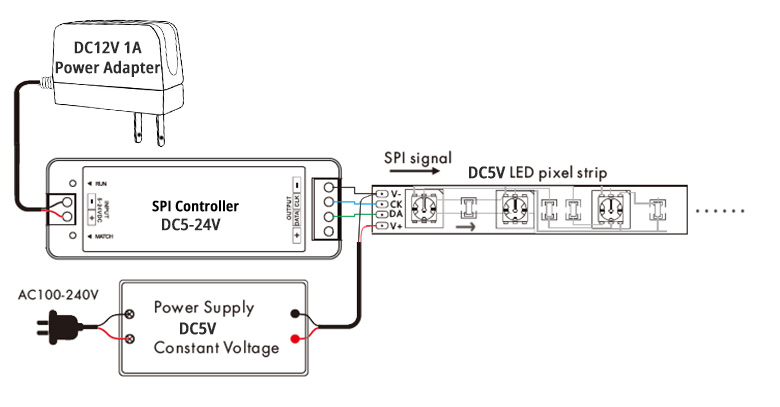
How to power addressable LED strip and SPI controller using different voltage power supply?
How to wire long addressable lighting strips?
For running long distance, there are some addressable led strip light kits for you, up to 20 meters long RGB neon light kit and up to 50 meters long addressable light strip kit. We provide the controller and power supply options in the kits, solving the troblue of choosing the right controller and power supply. If the project is a circle, the two ends of the light strip can be touched or overlapped, and the same power supply can be shared. And if the project is linear, two power supplies are required to supply power to both ends of the light strip separately.
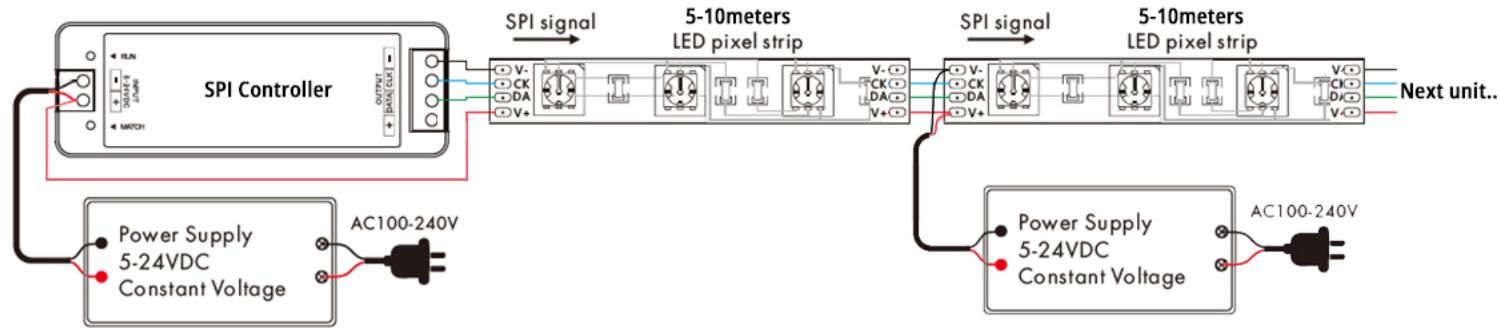
*SPI LED Strip lights wiring diagram with 20m+*
How to solve the LED light flickers?
This kind of problem is usually caused by the following two factors.
We need to add a MINI SPI amplifier in the closest area of the flicker. This amplifier is different from the above multi-channel amplifiers in that it only amplifies the attenuated SPI signal and cannot be amplified multiple times.
In North America, choose single-voltage power supply AC110-130V input as much as possible, and multiply the power of the light strip by 1.5 times when calculating the power supply in order to ensure sufficient output power of the power supply. If your led strip light requires 100W, then you'd better choose a 150W power supply. We have added a link for you on how to calculate the power for your led strip lights. You can click to jump to the page.
The following table is for reference only.
More LED strip wiring diagram:
How to wire single color led strip lights?
How to wire tunable white/CCT led strip lights?
How to wire RGB color changing led strip lights?
How to wire RGBCCT led strip lights?
Addressable LED strip FAQ
What are the 3 wires on an addressable LED strip?
V+ (5 V, 12 V or 24 V), data (DIN) and ground (GND). Strips with a fourth line add a clock (CLK) or a backup data line (BI).
Which end of the addressable LED strip do I connect?
The input end. The arrows on the strip show the direction of data flow; the controller must be on the data input side or the strip will not work.
Does my addressable LED strip need its own power supply?
Yes when the strip draws more power than the controller can pass, or when you see voltage drop: at full white brightness the far end looks dimmer. Power the strip from the supply and use the controller only for the signal.
Why does my addressable LED strip flicker?
Usually the SPI signal is attenuated because the strip or the cable to the controller is too long, or the power supply is not strong enough. Add a mini SPI amplifier near where the flicker starts, and size the supply with headroom.
How many pixels can an SPI controller drive?
The controller’s pixel count must be larger than the number of pixels on your strip. If it is not, use a controller with more pixels or add an SPI multi-channel amplifier.
Parts for wiring addressable LED strips
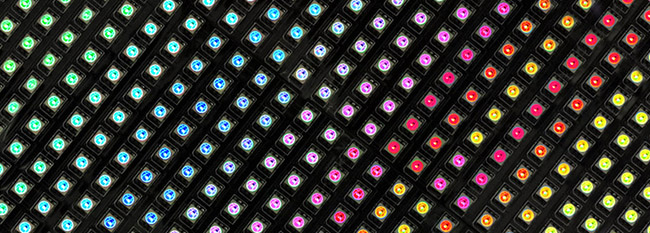 Addressable LED strip lightsWS2812B, WS2815, SK6812 and more
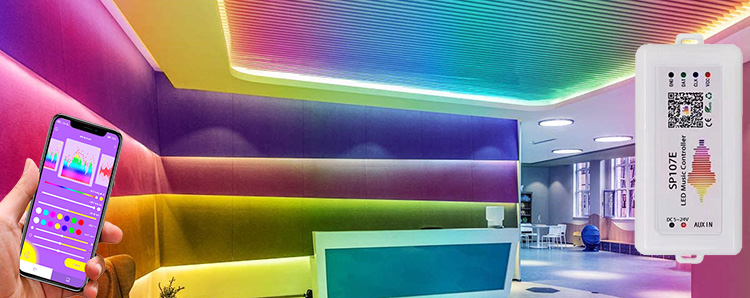 Addressable dream color controllersWiFi, RF, Bluetooth, music
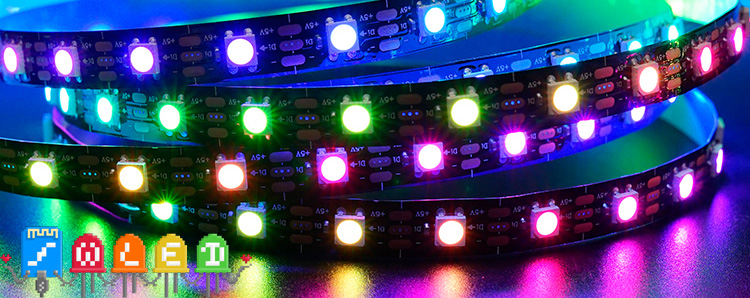 WLED controllersOpen-source control for DIY projects
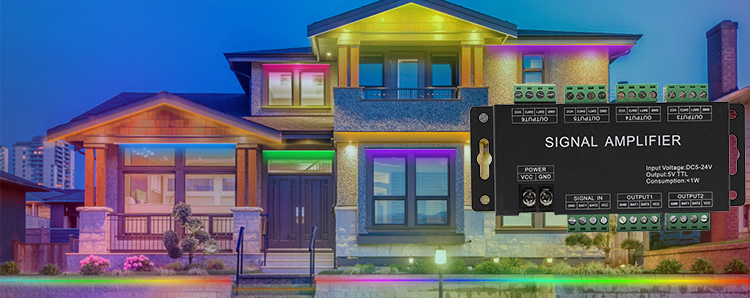 SPI signal amplifiersFix flicker and extend pixels
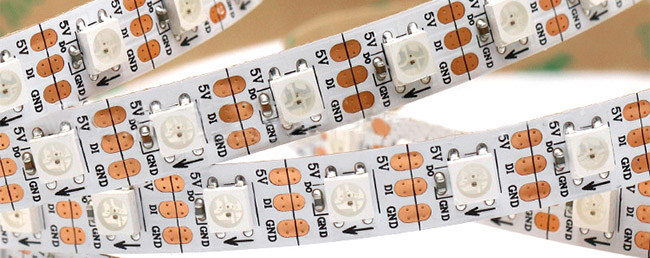 Single signal LED strips3-pin data strips
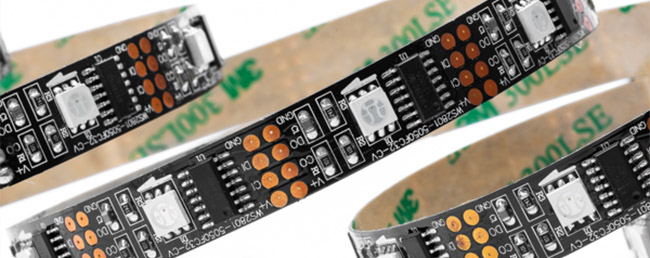 Dual signal LED strips4-pin data + clock strips
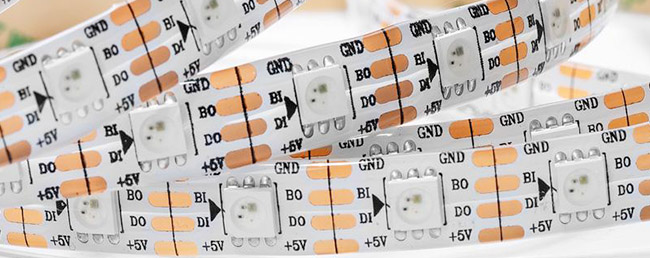 Breakpoint resume stripsKeeps running past a dead pixel
 Color chasing LED strip kitsStrip, controller and supply in one box
Tell us your strip IC, voltage and length, and the SuperLightingLED team will match a controller, amplifier and power supply. Custom lengths can be made to order. Contact our team