
How to Wire RGBW LED Strips?
An RGBW LED strip has five pads: one common positive (V+) and four color signal lines, R, G, B and W. Every color line is a switched negative channel. To wire it:
- Strip to controller: V+ to V+, R to R, G to G, B to B and W to W on the RGBW controller output. Use a 5-pin connector.
- Controller to power supply: the red wire is the positive and the black wire is the negative. Positive to positive, negative to negative.
- Plug in and test all four channels (red, green, blue and white) before you mount the strip.
Match the controller to the pad count, not just the color name: a 5-pad RGBW strip needs a 4-channel RGBW controller. Longer than one reel? Add a 4-channel RGBW amplifier (see multiple strips).
What does RGBW stand for? RGBW means that there are four colors of R(red), G(green), B(blue), and W(white) on a lamp bead or a group of lamp beads. RGBW led strip is equivalent to RGB color plus a white light.
At SuperLightingLED we wire RGBW strips, controllers and amplifiers for home and commercial projects every day. Below are the 5-pin pinout and the wiring diagrams we use, how RGBW differs from RGB and RGBWW, and the installation and long-run steps.
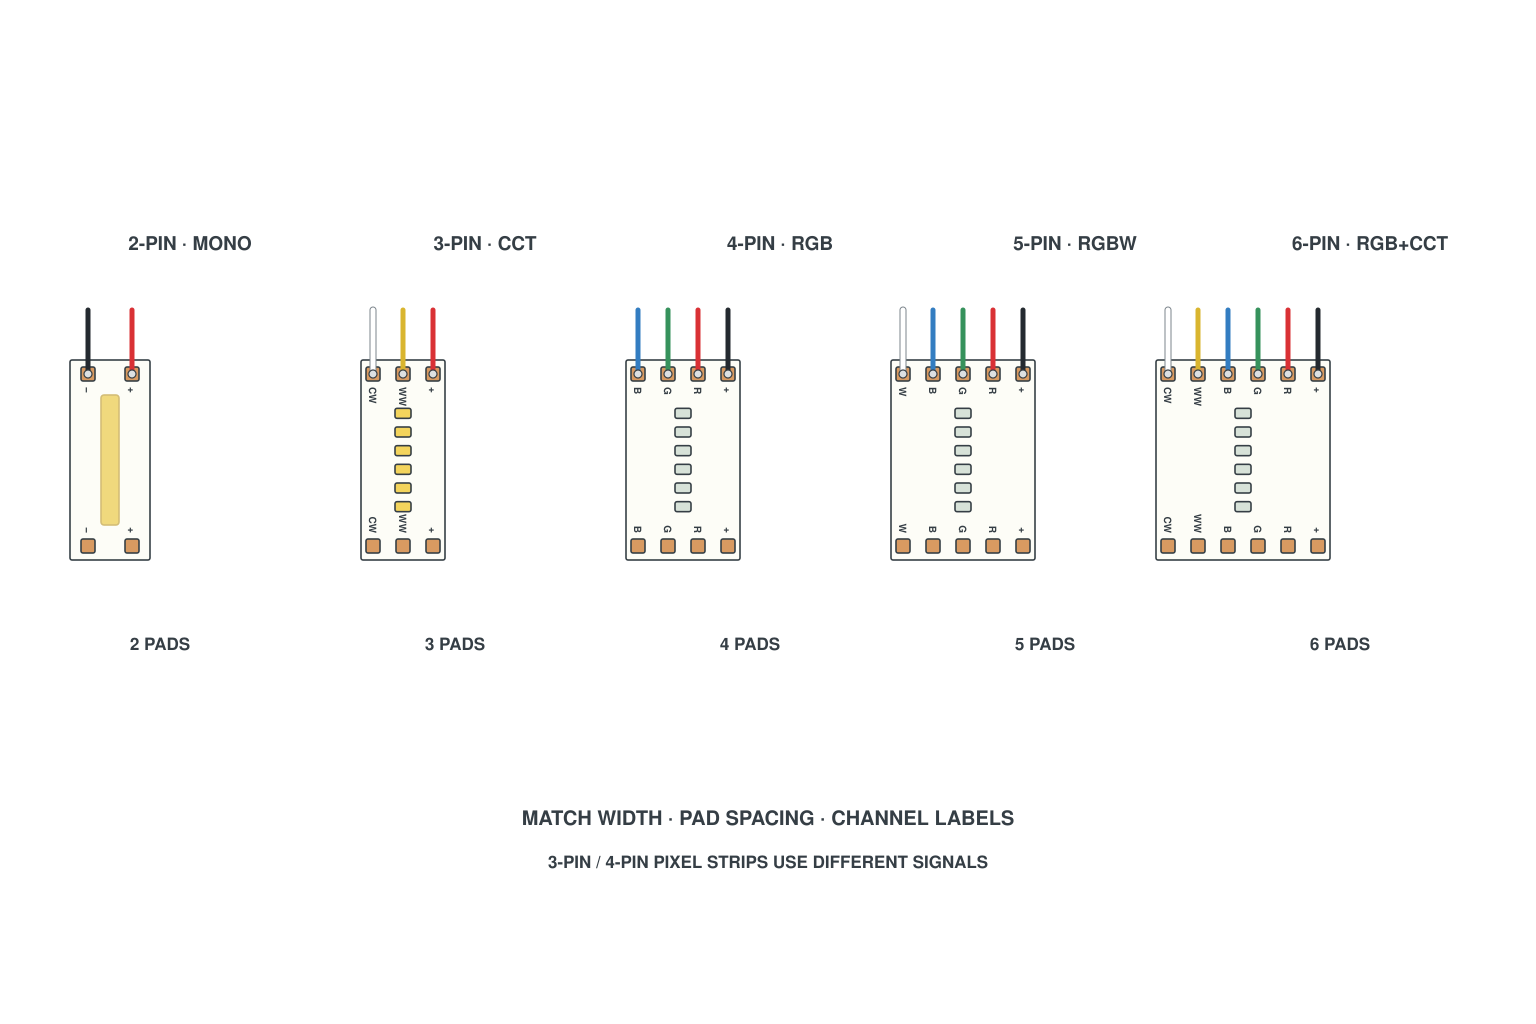
RGBW LED strip pinout: the 5 pins
An RGBW strip is common positive: the V+ pad feeds every color, and the controller switches each color on its own negative line. Count five pads at the cut mark and match them one to one with the RGBW controller output:
| Pad on the strip | What it is | Connect to |
|---|---|---|
| V+ | The positive line, common to all four colors; DC12V or DC24V to match your strip | V+ on the RGBW controller output |
| R | Red color signal line (switched negative) | R on the controller output |
| G | Green color signal line (switched negative) | G on the controller output |
| B | Blue color signal line (switched negative) | B on the controller output |
| W | White color signal line (switched negative) | W on the controller output |
Wire by the marks printed on the strip pads and on the controller terminals, in the order printed on the strip. A 5-pin clip connector keeps the channels in pad order.
LED wire colors in our diagrams
In the SuperLightingLED wiring diagrams, wire colors follow our house drawing convention: red for V+, black for V-/GND, and green for data on addressable strips. This is how we draw our diagrams, not a universal standard, so do not wire by the color of the insulation alone; follow the letters on the pads and terminals.
- Controller to power supply: the red wire is the positive and the black wire is the negative (step 2 below).
- Solderless clip connectors: match red to +, then the channel colors in pad order (clip connector diagram).
RGBW LED strip wiring diagram
These diagrams are drawn by our engineering team for the LED strip wiring diagrams library. Click any diagram for the full notes and the parts list.
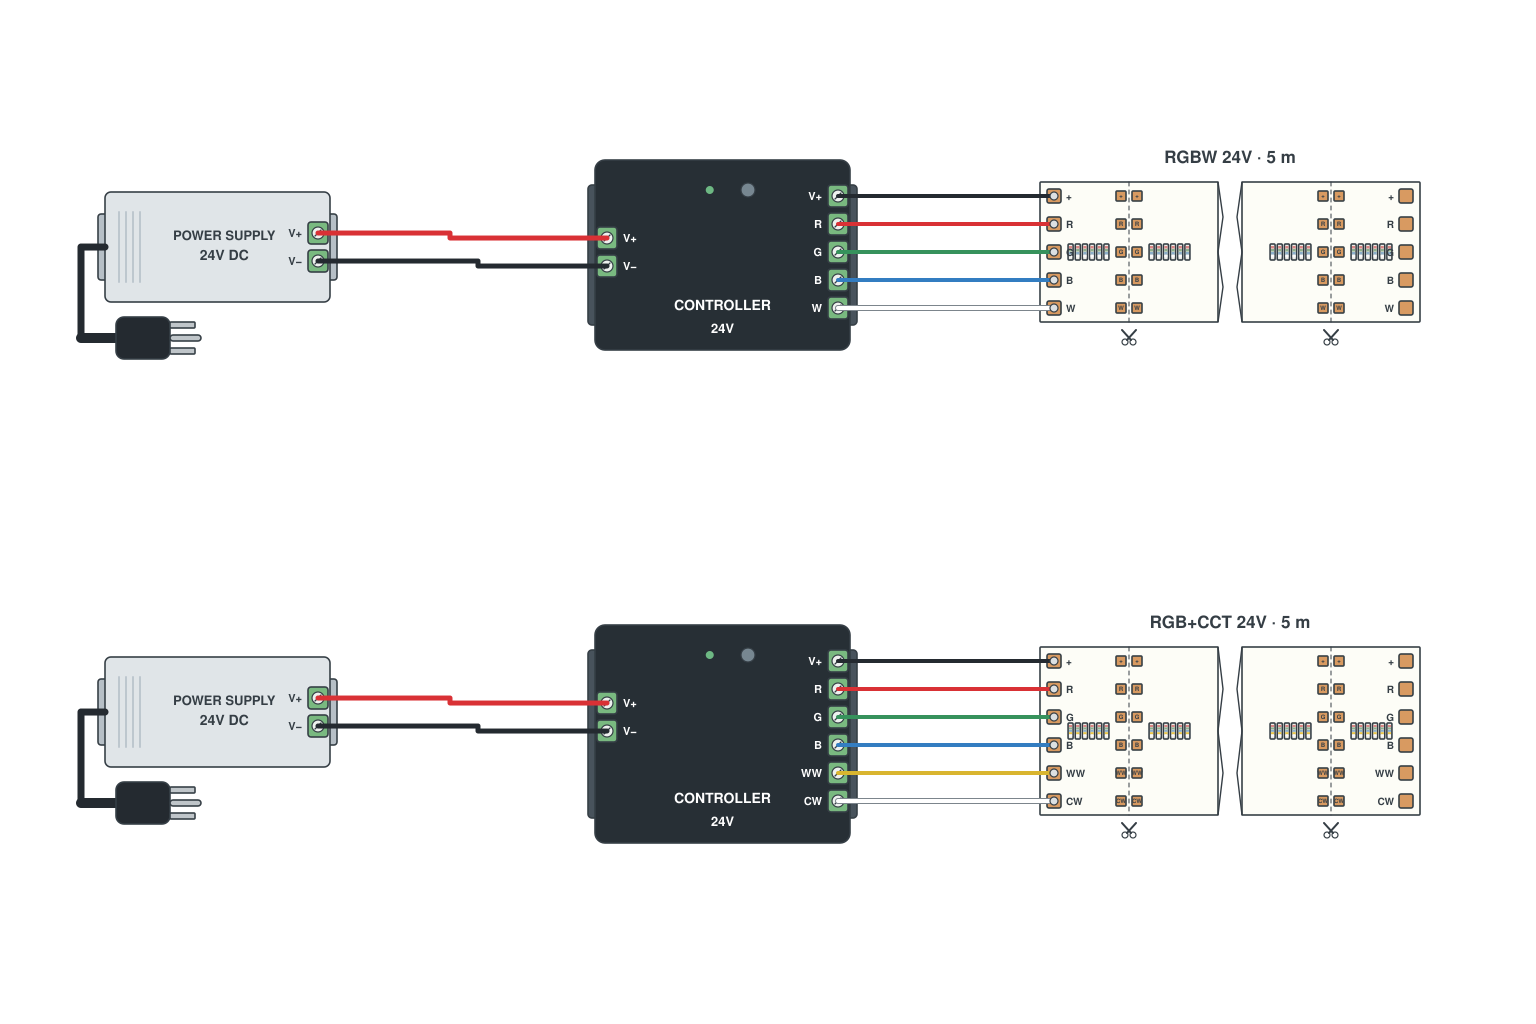
Looking for an RGBW cable? Our 5-pin RGBW LED strip parts range has 5-pin power wire cables, extension cables, Y-splitter cables, strip-to-wire and strip-to-strip connectors, and L, T and + corner connectors (see the corner connector diagram).
RGB vs RGBW vs RGBWW: which strip do you have?
The pad count tells you the strip type, and the strip type decides the controller, amplifier and connector:
| Strip type | Pads at the cut mark | Color channels | Controller and parts | Wiring guide |
|---|---|---|---|---|
| RGB | 4: V+, R, G, B | 3 (red, green, blue) | RGB controller; 3 channels on a DMX decoder | How to wire RGB LED strips |
| RGBW | 5: V+, R, G, B, W | 4 (RGB + one white) | RGBW controller, 4-channel amplifier, 5-pin connectors; 4 channels on DMX | This page |
| RGBWW (RGB+CCT) | 6: V+, R, G, B, CW, WW | 5 (RGB + two whites) | RGB+CCT controller, 6-channel amplifier, 6-pin connectors; 5 or 6 channels on DMX | How to wire RGBWW LED strips |
| Tunable white (CCT) | 3: V+, WW, CW | 2 (warm and cool white) | CCT controller | How to wire tunable white LED strips |
Match the controller to the pad count, not just the color name. An RGBW controller drives 5-pad strips, but it cannot drive a 6-pad RGB+CCT strip properly: that strip has one more channel.
Constant current led strip lights VS Constant voltage led strip lights
1. Constant current RGBW led strip
Constant current led strip lights have no voltage drop over long distances, which means that the brightness of the led light strip remains the same when power is supplied to one end of the led lighting strip.
Constant current RGBW led strip can be up to 20 meters without voltage drop, supports DC24V and the white light has options for 3000K and 6000K. It is suitable for long-distance installation without voltage drop. There is no need for complicated wiring, which saves the cost of led strip installation.
How to install constant current led strip lights? Constant current RGBW led strip still needs to be controlled by the constant voltage led controller and powered by the constant voltage led driver.
2. Constant voltage RGBW led strips
• RGBW led strips: DC12V, DC24V • COB RGBW led lighting: DC24V • Addressable RGBW led light strip: DC5V, DC12V, DC24V |
Constant voltage led strip lights mean that there are voltage drop. And in order to prevent the inconsistency of led color and brightness caused by the voltage drop, different voltage led light strip has different wiring method.
5V led strip lights ⇒ Voltage drop in 5 meters ⇒ Power supply at both ends of 5 meters
12V led strip lights ⇒ No voltage drop in 5 meters ⇒ Power supply at both ends of 10 meters, power supply at one end of 5 meters
24V led strip lights ⇒ No voltage drop in 10 meters ⇒ Power supply at both ends of 15 meters, power supply at one end of 10 meters
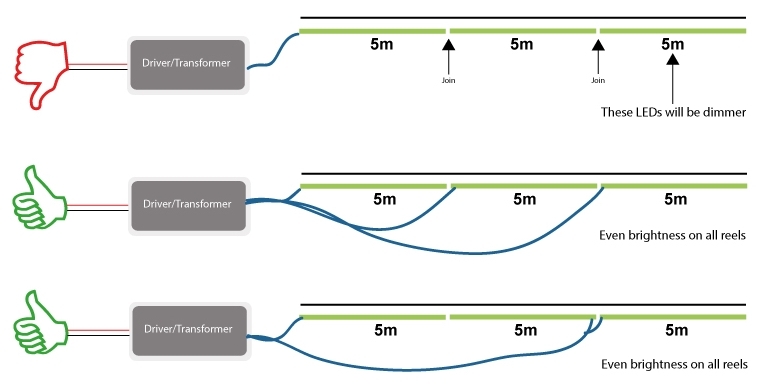
How to install led light strip?
Step 1. Connect the RGBW led strip to the RGBW controller.
The RGBW led strip has five wires which are the red color signal line, the green color signal line, the blue color signal line, the white color signal line, and the positive line. Connect the light strip to the corresponding mark on the RGBW controller.
Step 2. Connect the RGBW controller to the led power supply.
Please note that the red wire is the positive and the black wire is the negative. Positive to positive and negative to negative.
Step 3. Plug the power into the outlet.
Test if the RGBW led strip is connected correctly.

Sizing the supply: add up the strip wattage with how to calculate power for LED strip lights, then choose from our LED power supplies.
How to connect multiple RGBW led strips?
Low-voltage RGBW led strip lights with long-distance will have voltage drop. How to prevent the voltage drop? There are three wiring methods.
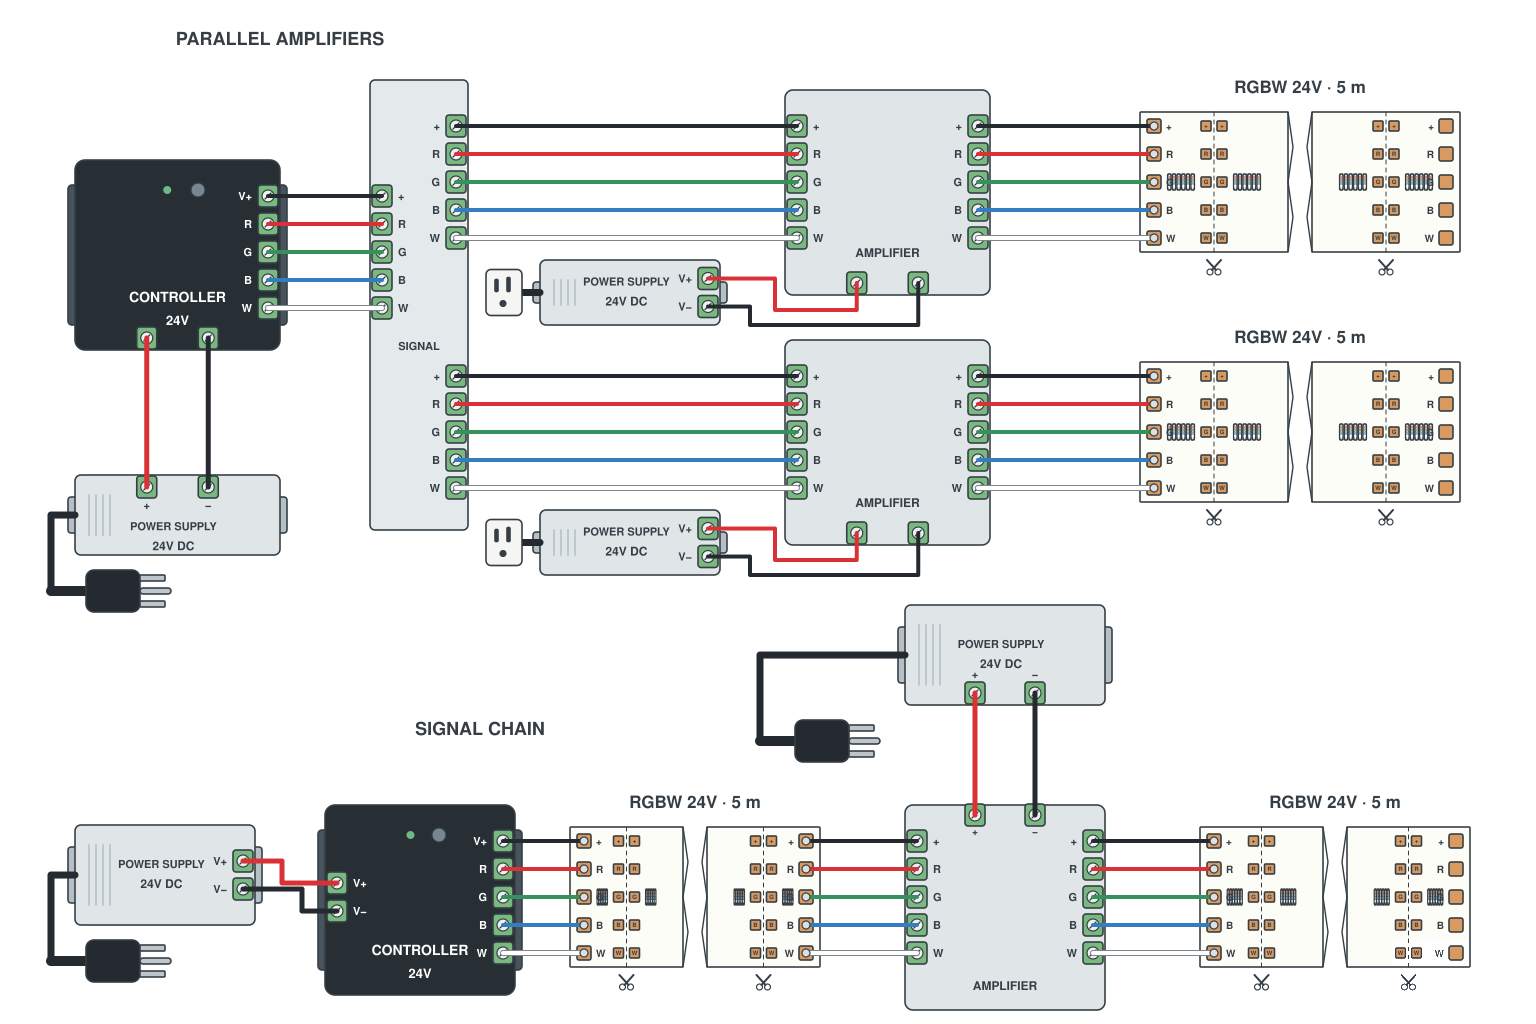
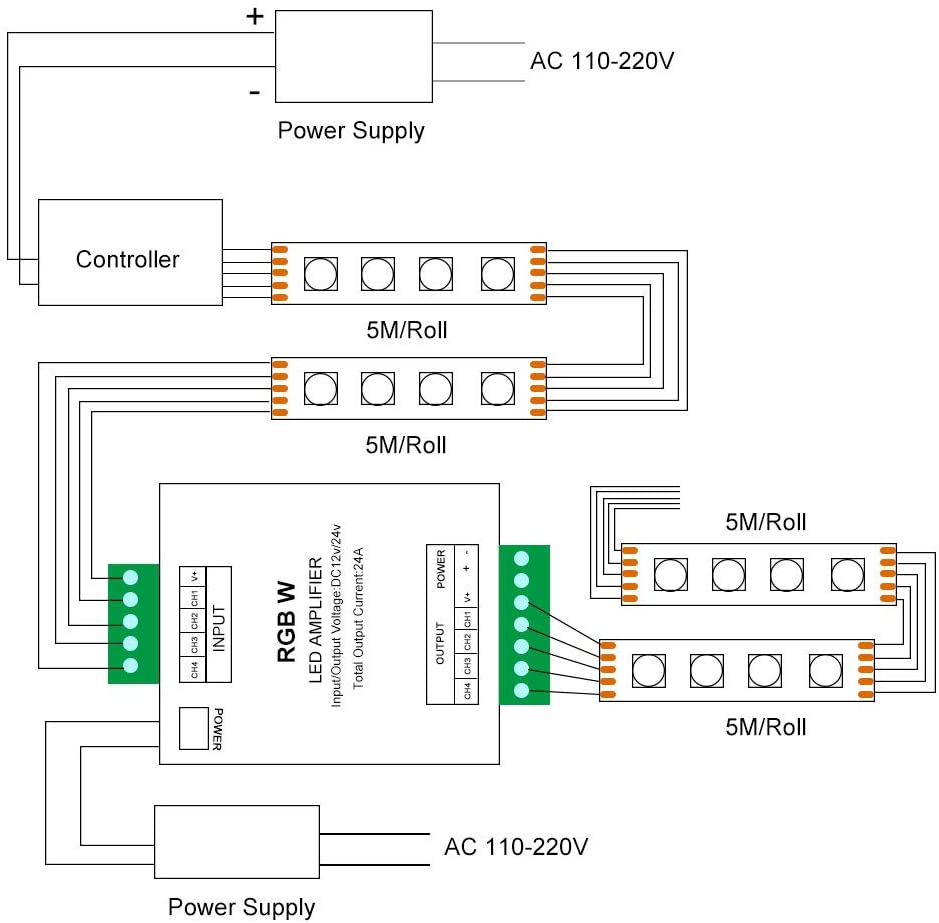
1) RGBW led amplifier
The amplifier can be used in the following situations: the led light controller is overloaded, and you want to connect the light strips in series or parallel but do not want to have a voltage drop.
The function of the amplifier is to enhance the weakened signal in the transportation circuit to make the led brightness or color more consistent.
►Connect led strip lights in series with led amplifier:
►Connect led strip lights in parallel with led amplifier:
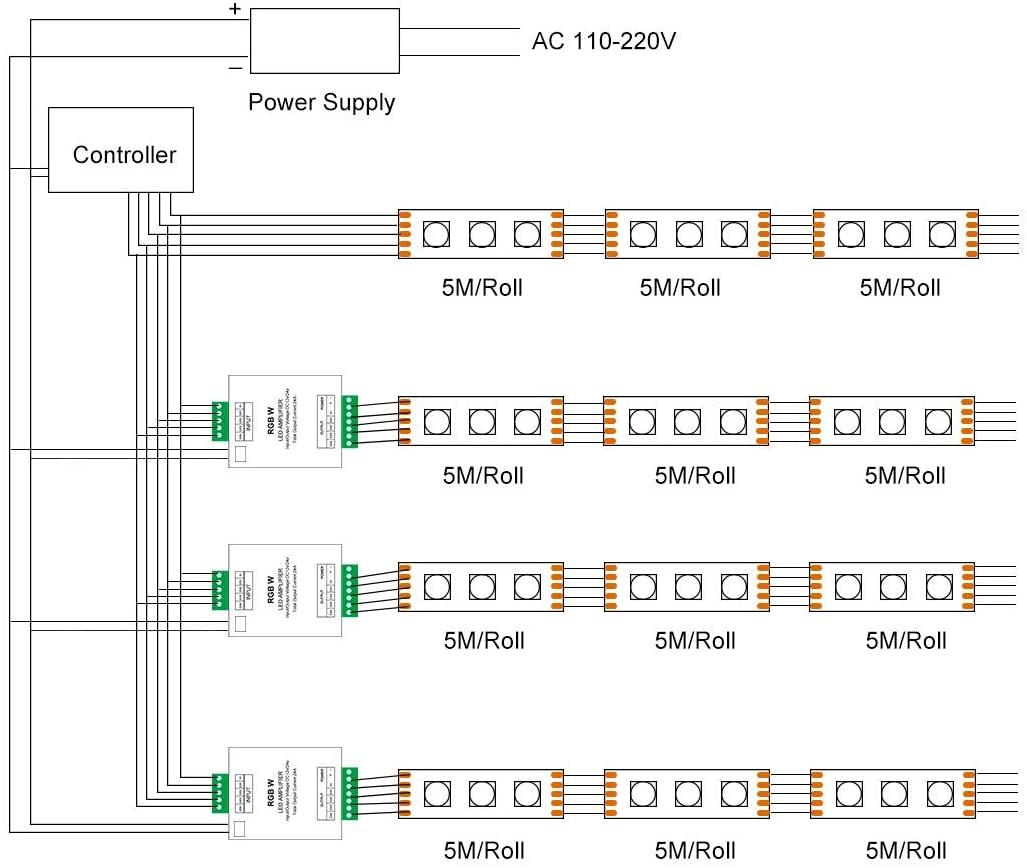
For an RGBW run, match the amplifier to the strip: 4 channels for RGBW, not 3. Either way the colors stay synchronized; only the power is local. See the RGBW amplifier wiring diagram.
2) RF RGBW led controller
Automatic signal synchronization is achieved within 30 meters between the radio frequency controllers. The signal is output from the RF remote control, and the controller receives and automatically synchronizes to the next controller within the effective distance, realizing long-distance control of the light strip. RF RGBW controller can be controlled by smart phone with WiFi-Relay.
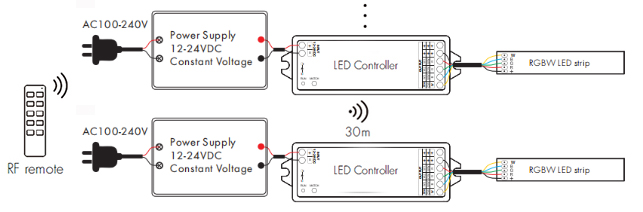
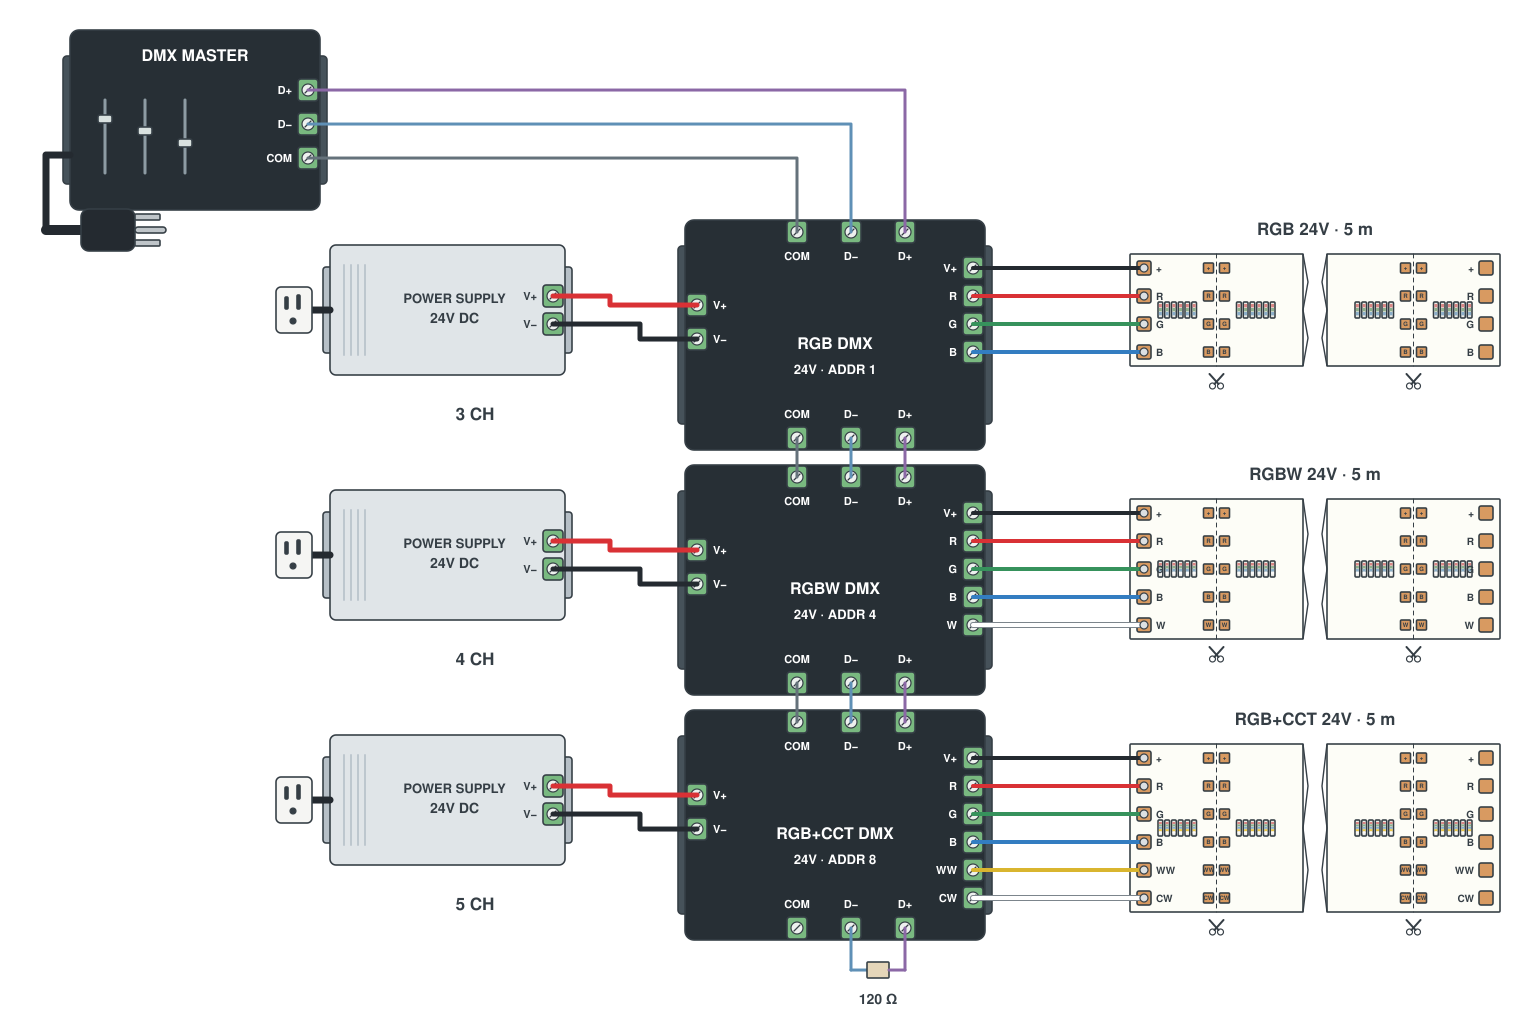
3) DMX decoder
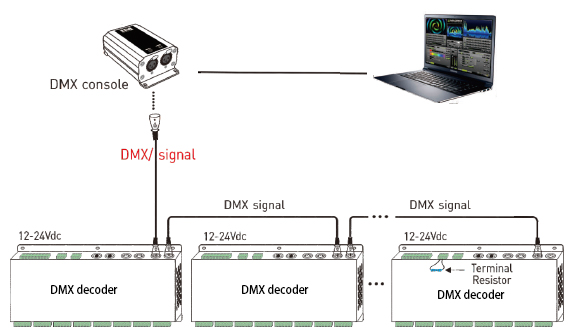
The DMX decoder converts the DMX512 signal into a PWM signal, so that the ordinary led light strip is compatible with the DMX512 system. The DMX system can be controlled by a DMX console or a computer, and is programmable. It is often used for large-scale commercial lighting or compatible with DMX system applications.
The DMX decoder can cascade multiple led strip lights, or connect a single led strip. A light strip counts as a DMX address, which can be controlled freely.
►Connect multiple led strip lights with DMX decoder:

►Connect one led strip light with DMX decoder:
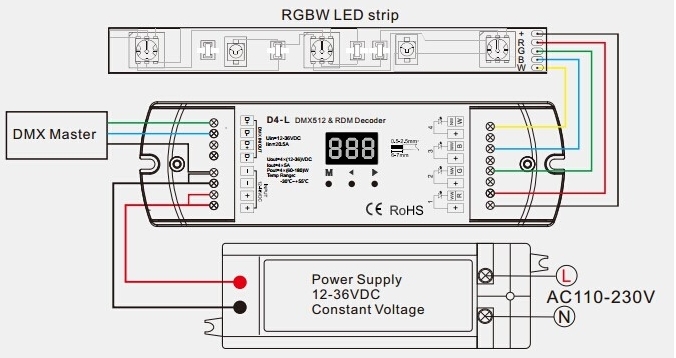
Choosing a decoder: 4 channels for an RGBW strip (3 for RGB, 5 or 6 for RGB+CCT). See the DMX decoder wiring diagram.
RGBW controllers and 5-pin parts
Every RGBW strip needs a controller between the strip and the power supply. Pick it by how you want to control the colors, then add the 5-pin parts for your layout. These are the SuperLightingLED categories we build RGBW projects from:
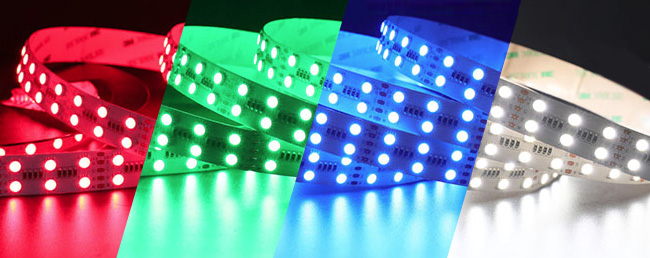 RGBW LED strip lightsDC12V and DC24V RGBW reels
 RGBW controller seriesControllers for 5-pad strips
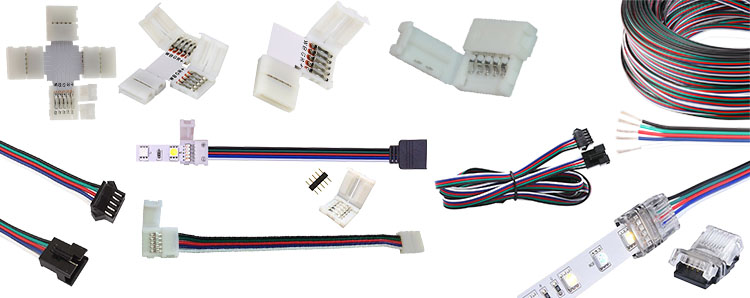 5-pin RGBW LED strip parts5-pin connectors and cables
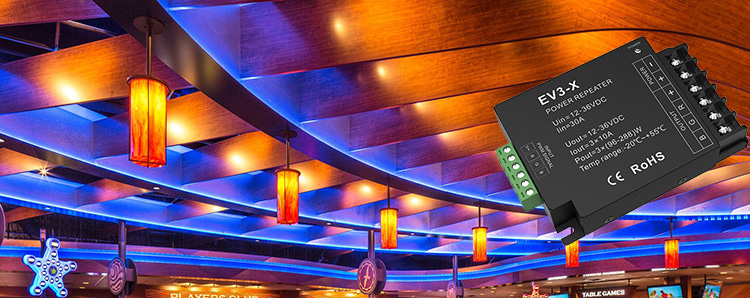 RGB/RGBW/RGBCCT amplifiersLong runs without voltage drop
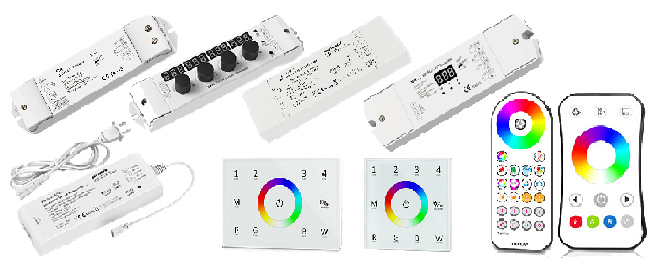 RF RGBW control systemMulti-zone, controllers sync within 30 m
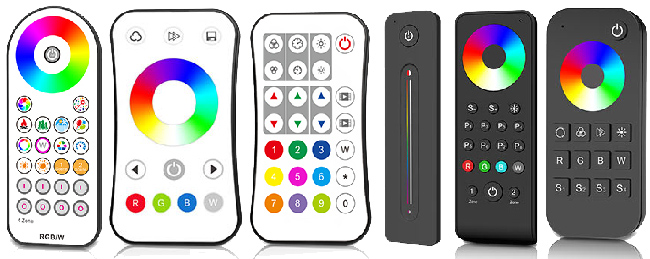 RF RGBW remote controlsOne remote, several RF controllers
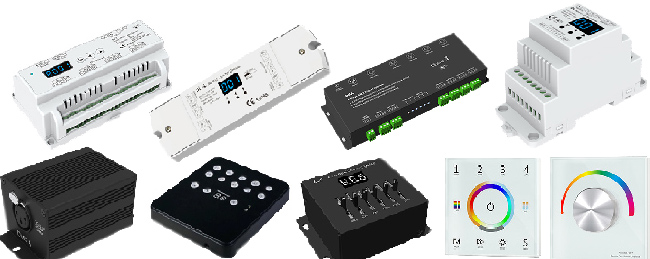 DMX512 control systemDecoders for DMX consoles
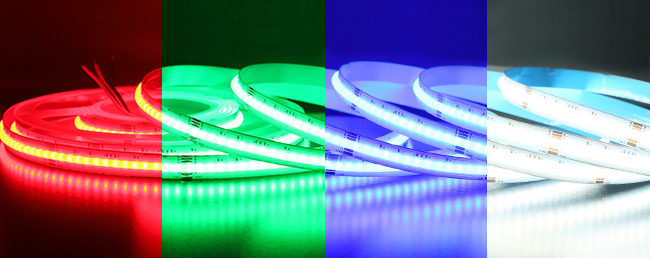 COB LED strip RGB+WCOB RGBW LED strips
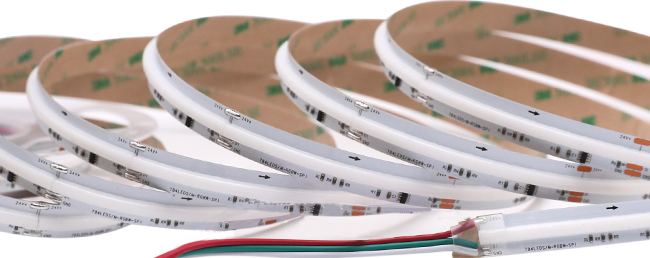 Addressable RGBW LED stripsDC5V, DC12V and DC24V
Addressable RGBW LED strips
The strip list at the top of this page also has addressable RGBW strips in DC5V, DC12V and DC24V. They are not wired pad for pad like the 5-pad strips above: they take a data signal from an addressable RGBW controller, so follow How to wire addressable LED strip lights. Browse the full range of addressable RGBW LED strips.
RGBW LED strip FAQ
How many wires does an RGBW LED strip have?
Five: the positive line and four color signal lines for red, green, blue and white. The positive (V+) is common; each color line is a switched negative channel.
Which controller do I need for an RGBW LED strip?
An RGBW controller that outputs V+, R, G, B and W. Match the controller to the pad count, not just the color name: on DMX, use a 4-channel decoder. An RGBW controller cannot drive a 6-pad RGB+CCT strip properly because that strip has one more channel.
What do the LED wire colors mean?
In our wiring diagrams, red is V+ and black is V-/GND (green is data on addressable strips). This is our drawing convention, not a universal standard. When you connect the RGBW controller to the power supply, the red wire is the positive and the black wire is the negative. On the strip, wire by the marks on the pads and terminals: V+, R, G, B, W.
How far can an RGBW LED strip run?
A constant current RGBW strip can be up to 20 meters without voltage drop (DC24V). On constant voltage strips, a 12V strip has no voltage drop in 5 meters (power at both ends for 10 meters) and a 24V strip has none in 10 meters (power at both ends for 15 meters). For longer runs, use a 4-channel RGBW amplifier, RF RGBW controllers or a DMX decoder.
How do I connect multiple RGBW LED strips?
There are three wiring methods: an RGBW LED amplifier (in series or in parallel), RF RGBW controllers that synchronize automatically within 30 meters, or a DMX decoder, where each light strip counts as one DMX address.
Related reading: How to wire single color led strip lights?
How to wire tunable white/CCT led strip lights?
How to wire RGB color changing led strip lights?
Send us your run length, voltage and how you want to control it, and the SuperLightingLED team will put together the strip, controller, amplifier and power supply. Standard orders such as accessories and controllers ship within 24–48 hours; LED strip orders follow the production lead time shown on the product page. Contact our team