
How to Wire Single Color LED Strip Lights?
A single color LED strip has two wires: red is the positive pole (+) and black is the negative pole (-). Wiring it takes three steps:
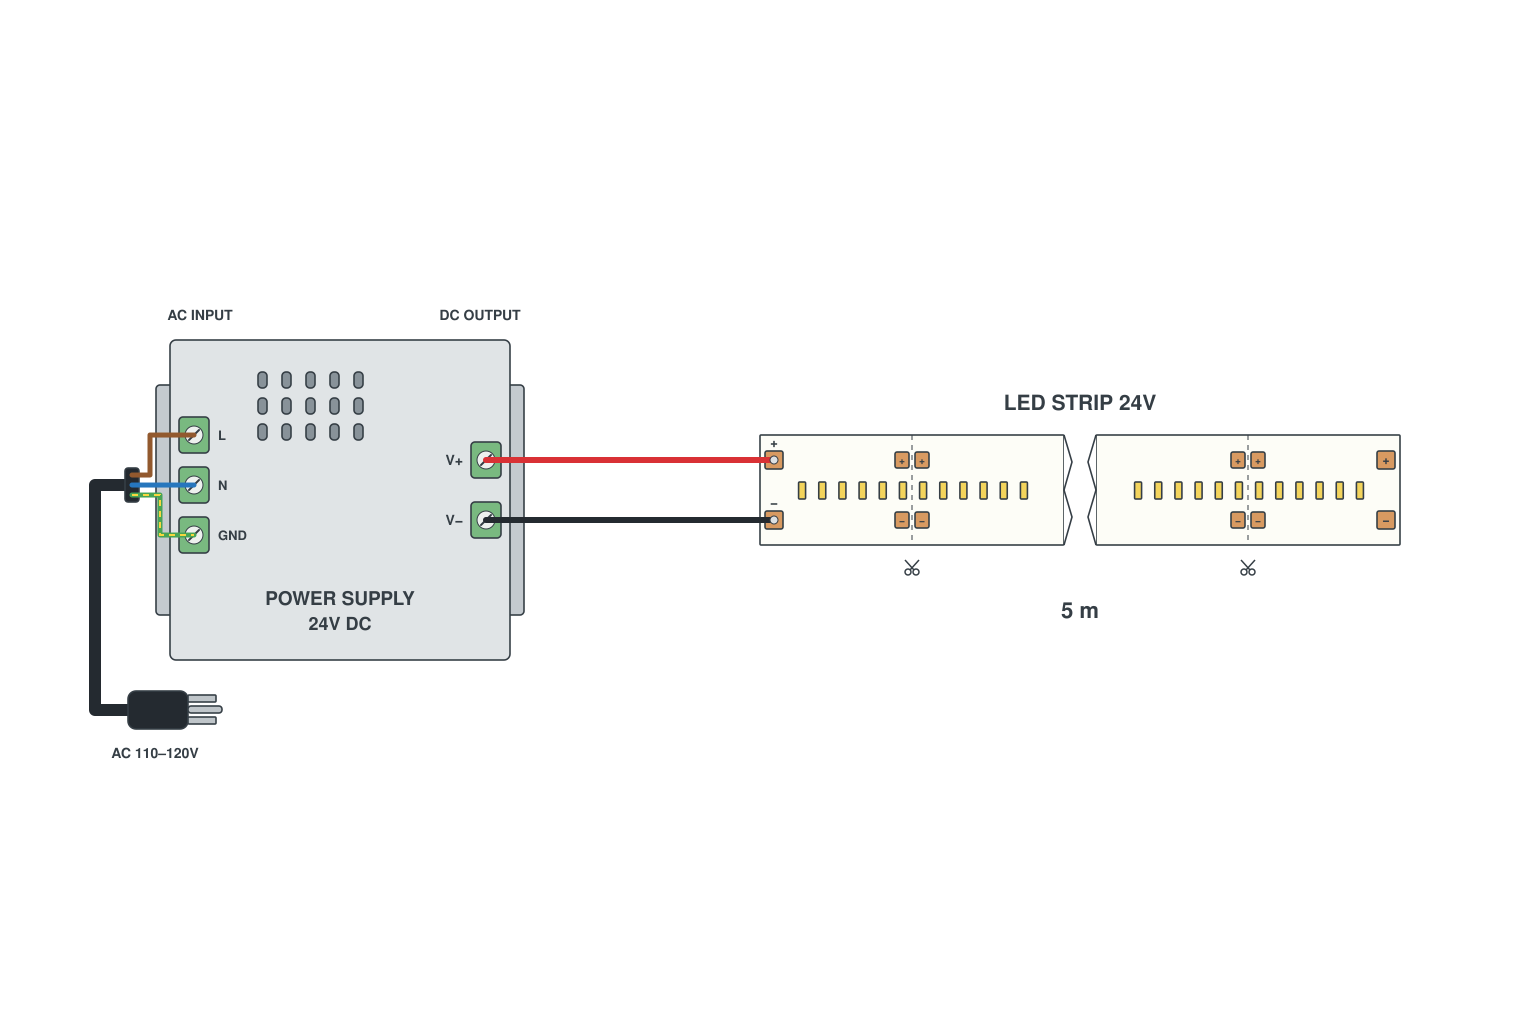
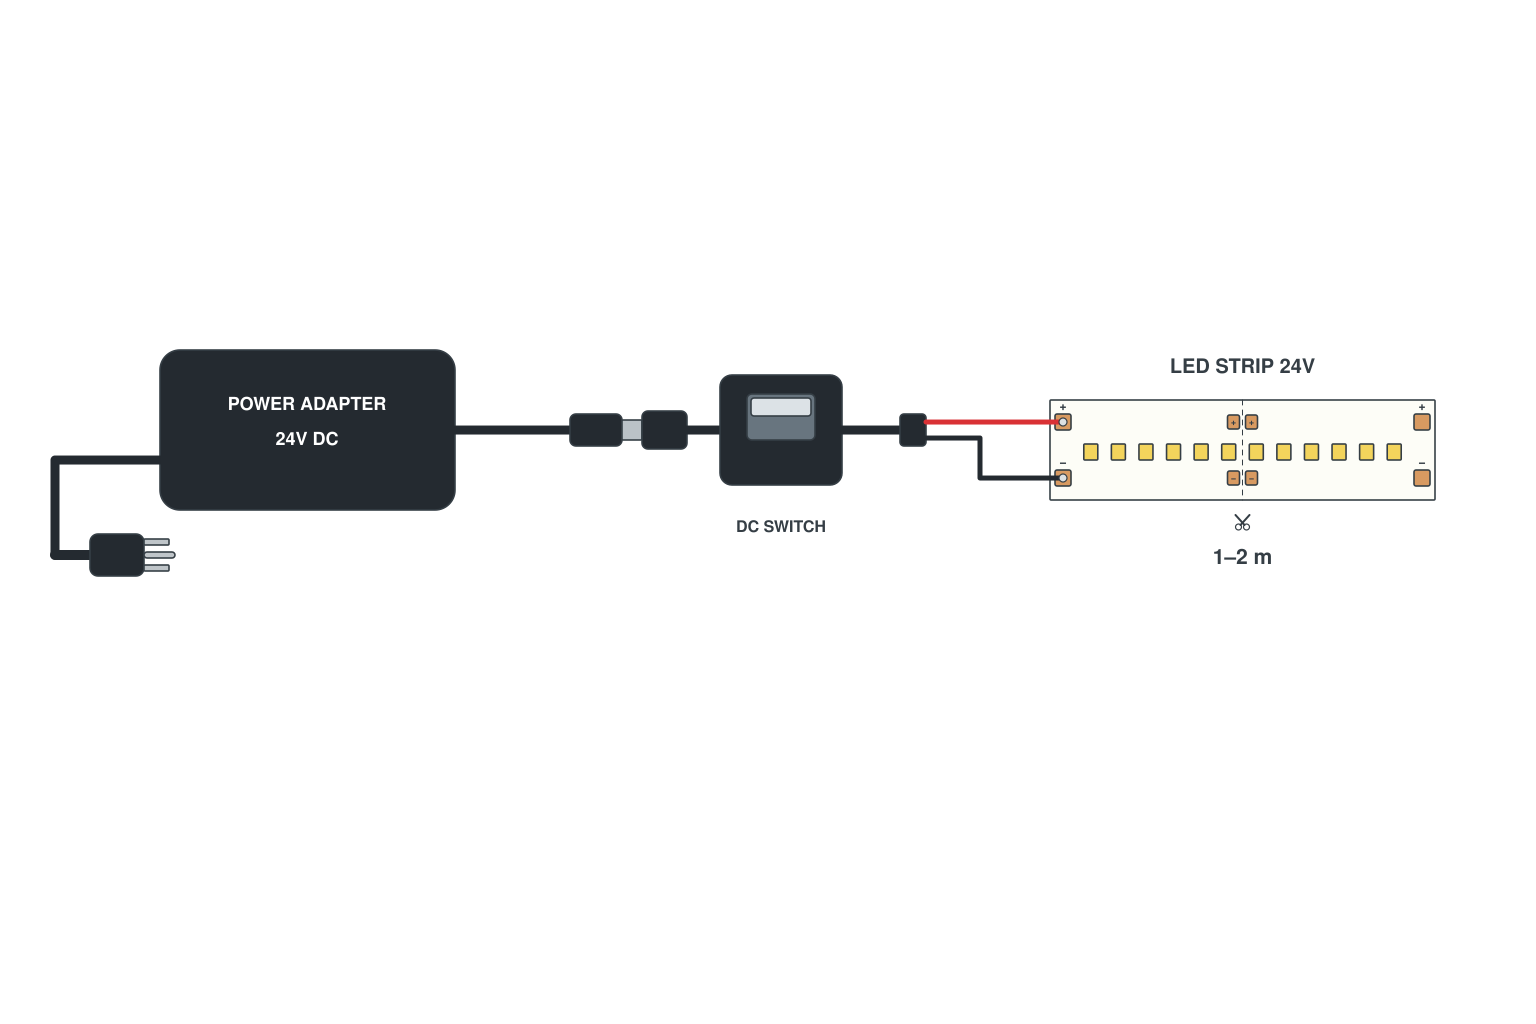
- Without a dimmer: strip + to the power supply V+, strip - to V-. Plug the supply in only after the strip is connected.
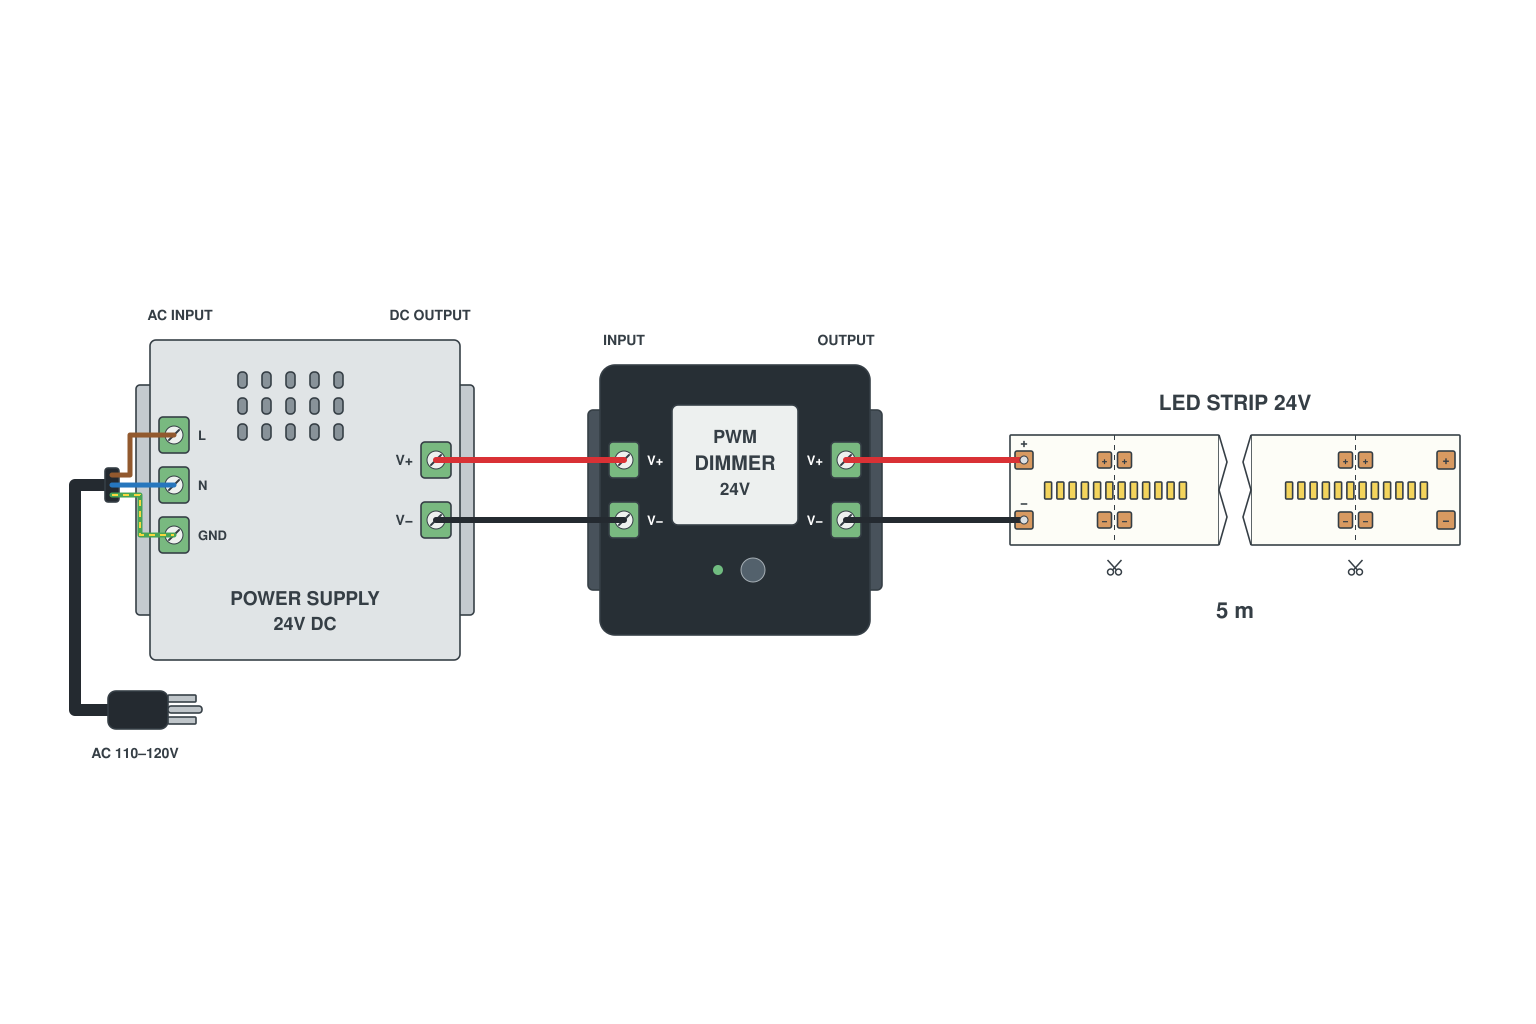
- With a dimmer: the LED strip goes to the dimmer output and the dimmer input goes to the power supply.
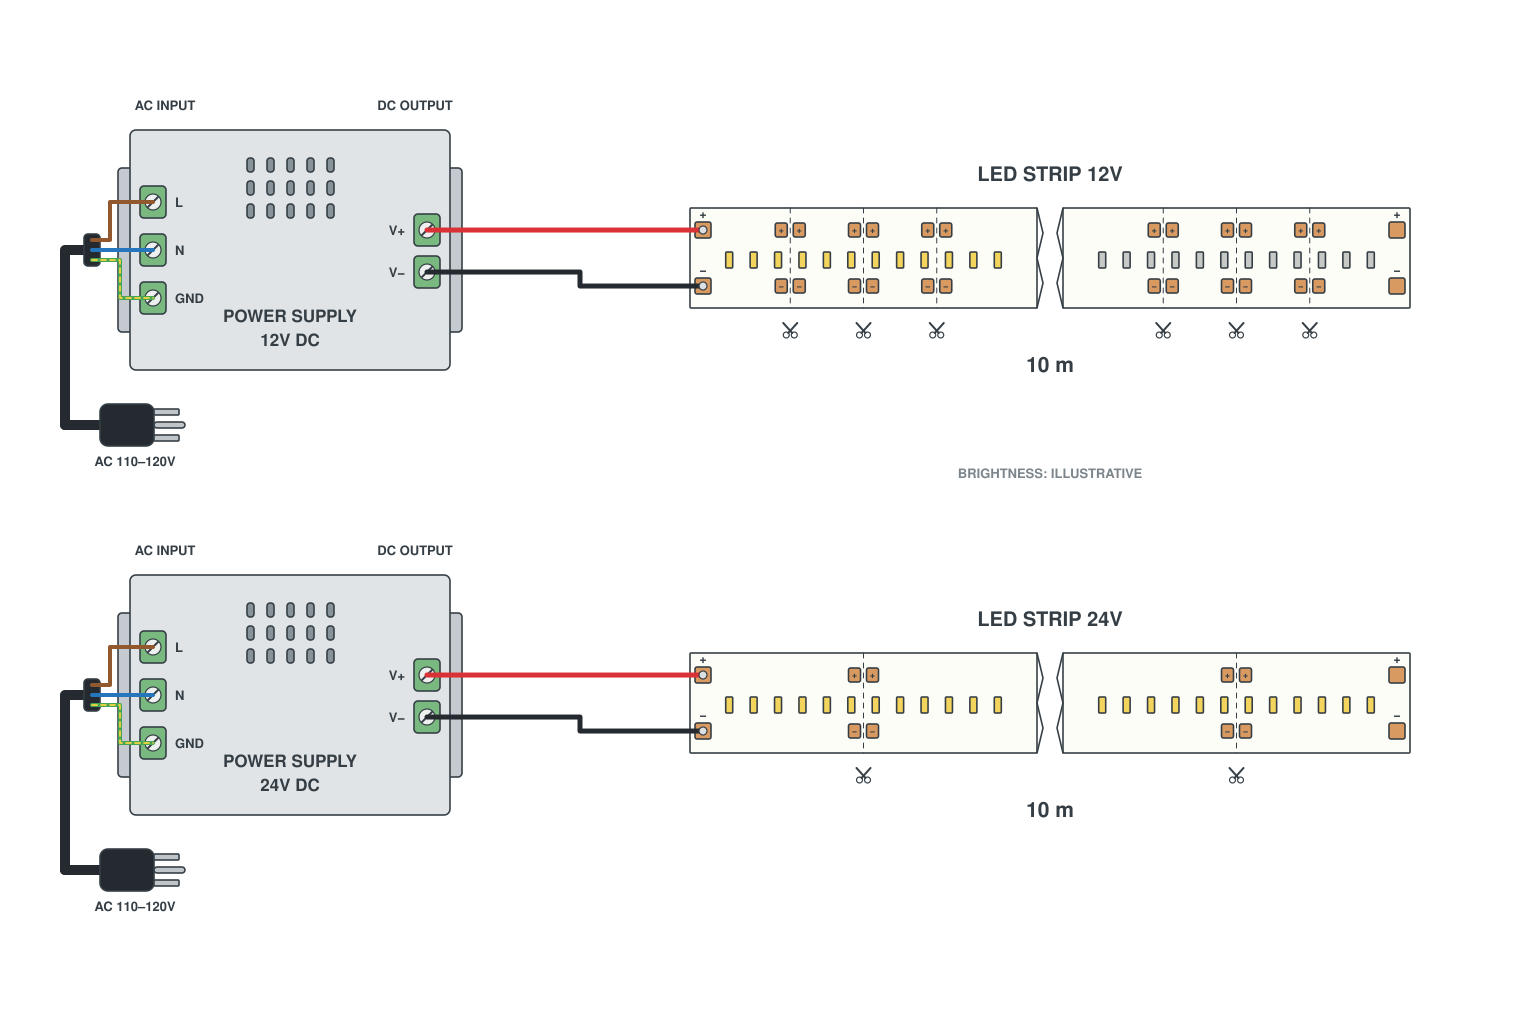
- Size and length: the strips should use no more than 80% of the power supply rating. A 12V strip can be fed from one end up to 5 meters, a 24V strip up to 10 meters; beyond that, feed power at both ends or at more points.
Diagrams for one strip, several strips, COB and neon are just below.
LED strip lights are suitable for a variety of application scenarios, and can be used as auxiliary LED lighting, decorative LED lighting, main LED lighting, plant growth lights and special wavelength lights. There are waterproof led strip lights, outdoor led strip lights, bedroom led strip lights, and led light strips for room, etc. The safety, softness, and cuttable characteristics of the led rope light itself bring us great convenience in using, allowing us to better enjoy the led light strips.
Single color led strip lights are the most basic of all led rope lights. Before starting the wiring of the single color led strip, please prepare the materials to be used: single color led strip lights, LED dimmer, LED driver, LED solderless connectors or soldering tools, screwdriver, 2-pin bare wire, wire stripper, scissors, tape measure, and other single color led light strip accessories.
At SuperLightingLED we wire single color LED strips for customers every day, from a 1 m shelf light to a 100 m corridor. Below you will find the 2-pin pinout, the wiring diagrams our engineers draw for 12V and 24V strips, COB LED strip and neon rope light wiring, how to add a dimmer, and three ways to wire a large project.
Single color LED strip wiring diagram (12V and 24V)
A single color LED strip is a 2-pin strip: at every cut mark there are two copper pads, marked + and -. These are the connection points for a wire, a connector or the next piece of strip.
| Pad on the strip | Wire | Connect to |
|---|---|---|
| + (positive) | Red wire | V+ on the power supply, or + on the dimmer OUT terminals |
| - (negative) | Black wire | V- on the power supply, or - on the dimmer OUT terminals |
Never connect the red wire to the black wire. Reversed polarity does no harm, but the strip stays dark, so if a new strip does not light, swap the two wires first. A plain single color strip can be fed from either end.
These diagrams are drawn by the SuperLightingLED engineering team. Wire colors follow our house convention: red V+, black V-/GND. Click a diagram for the full notes in our LED strip wiring diagrams library.
One single color LED strip
Several strips and long runs
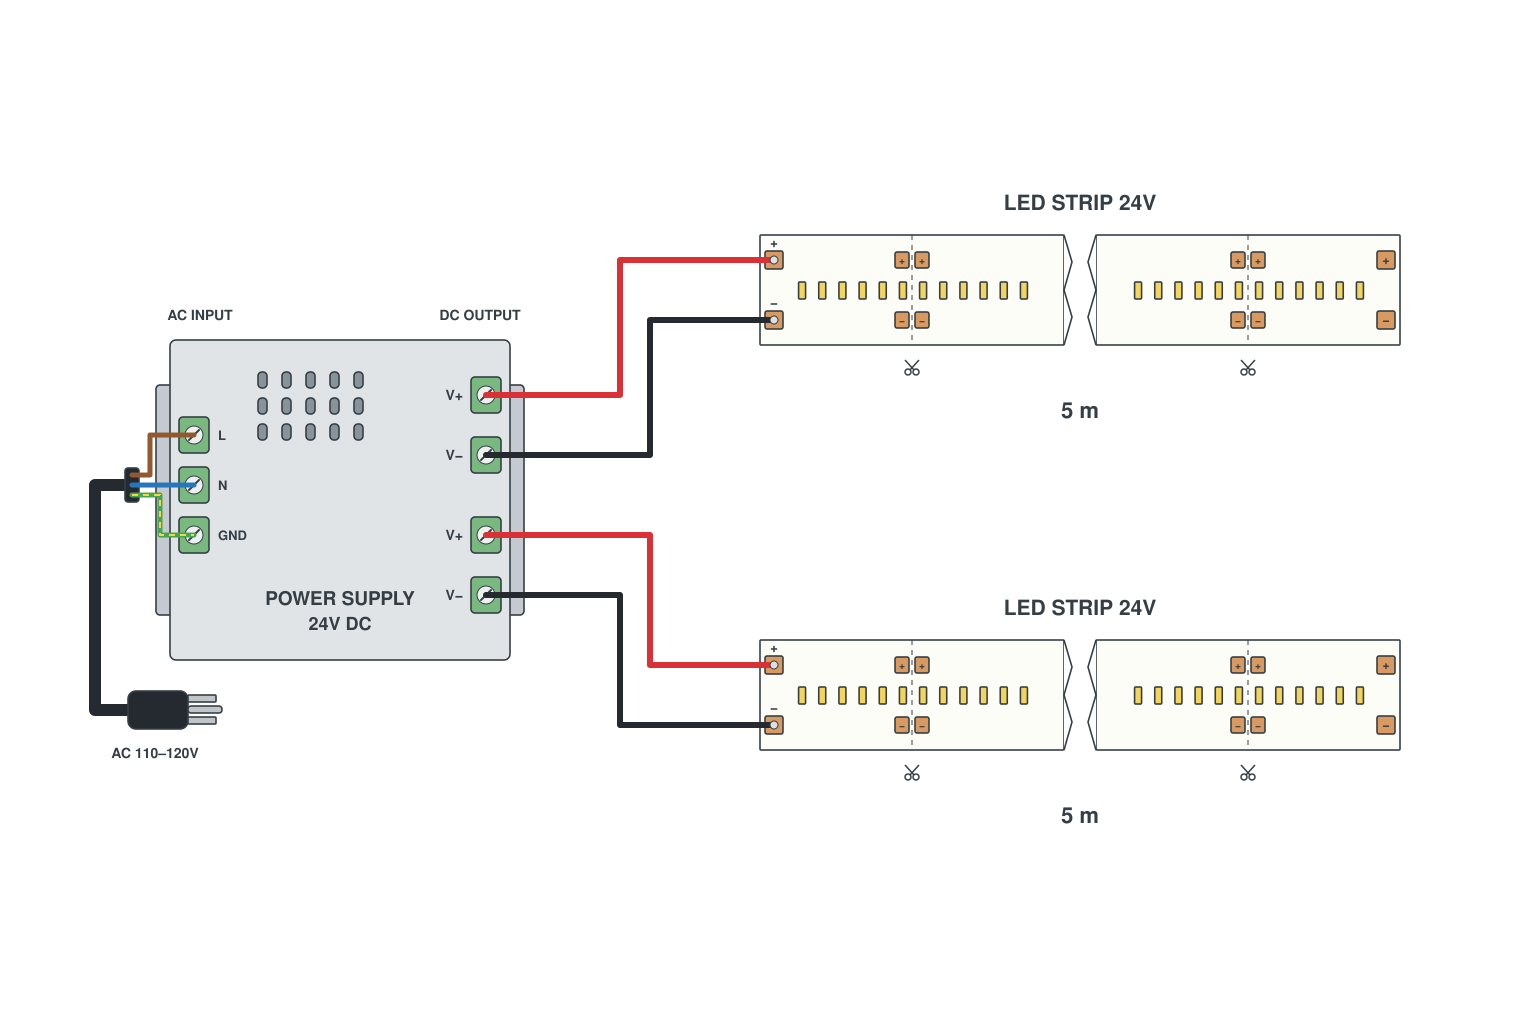
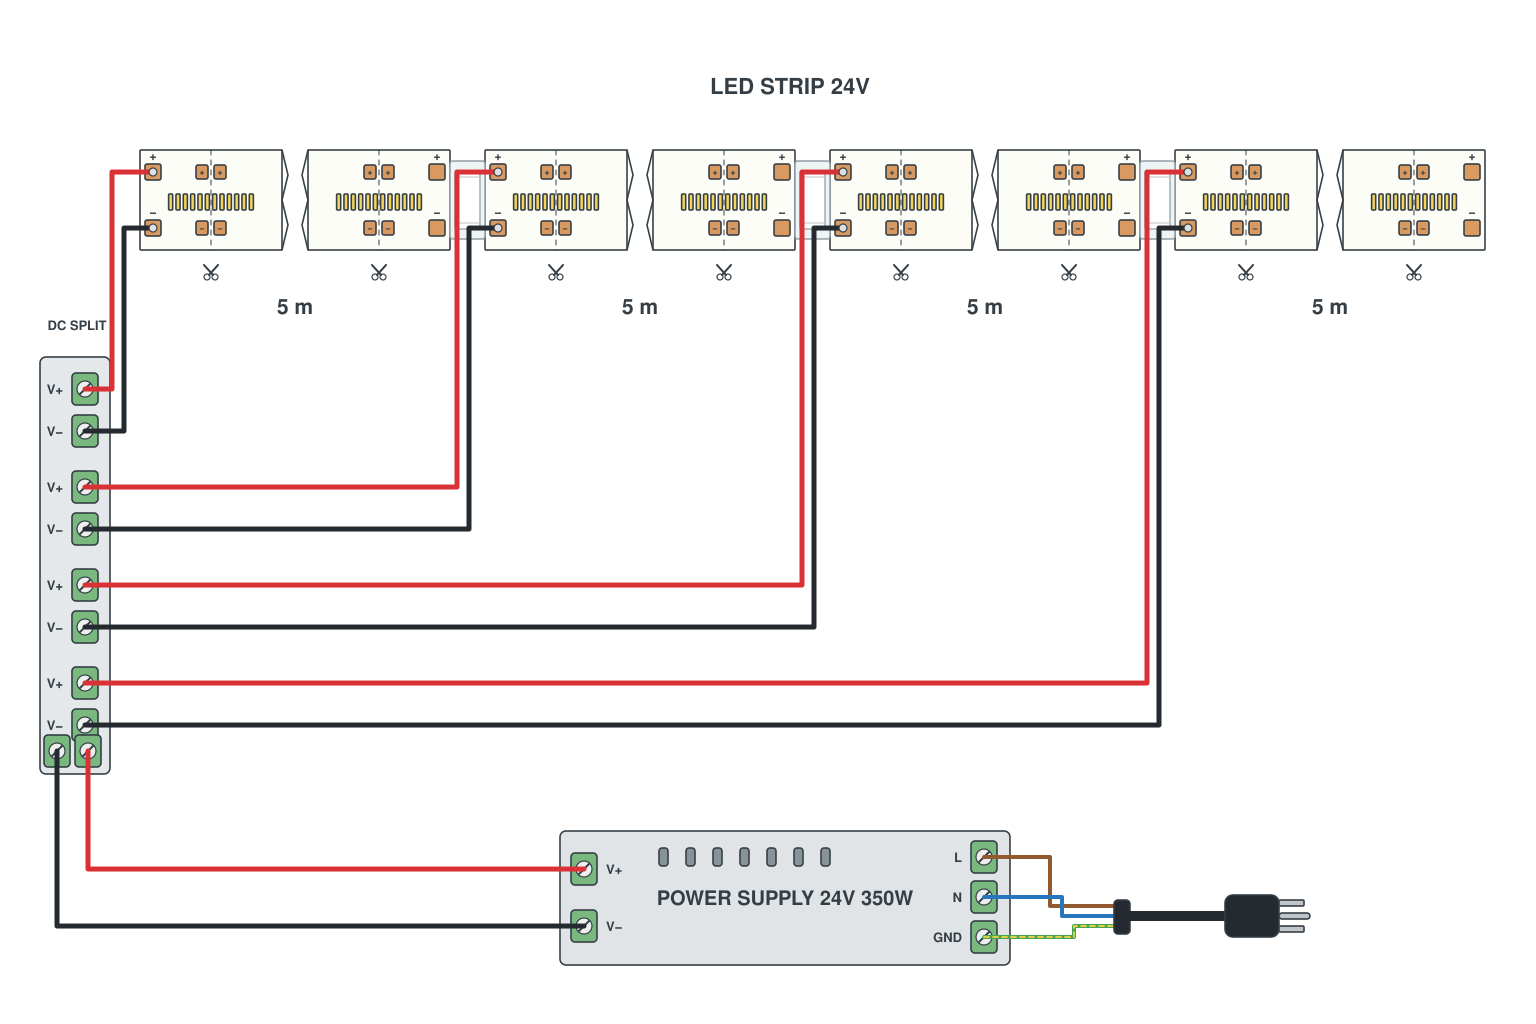
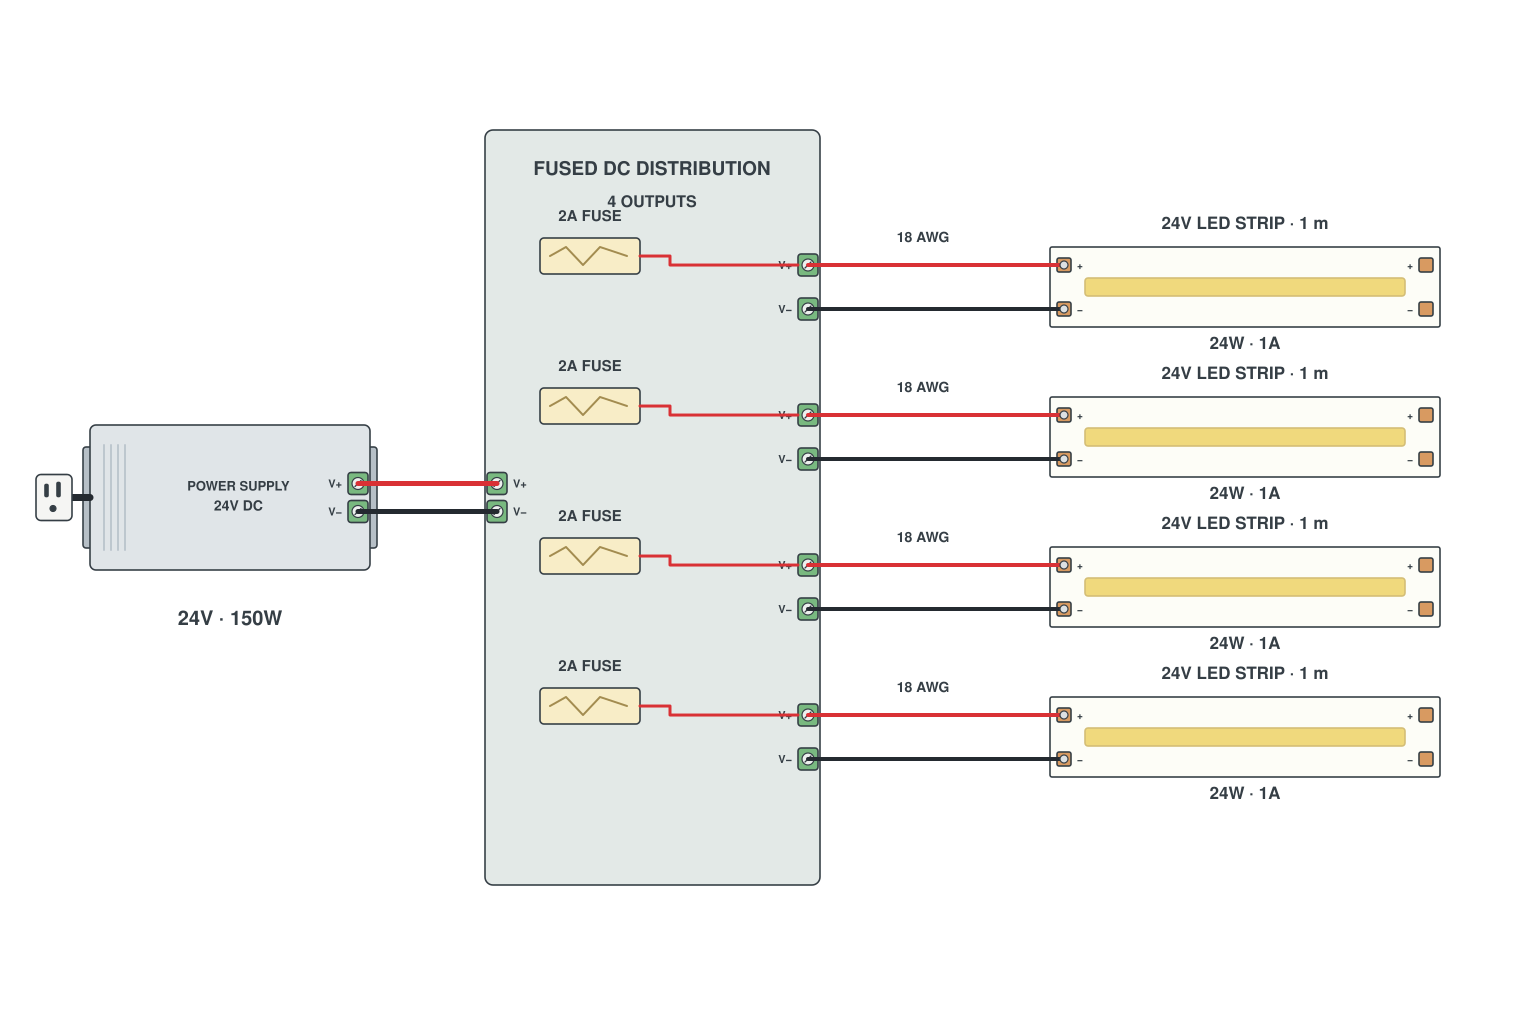
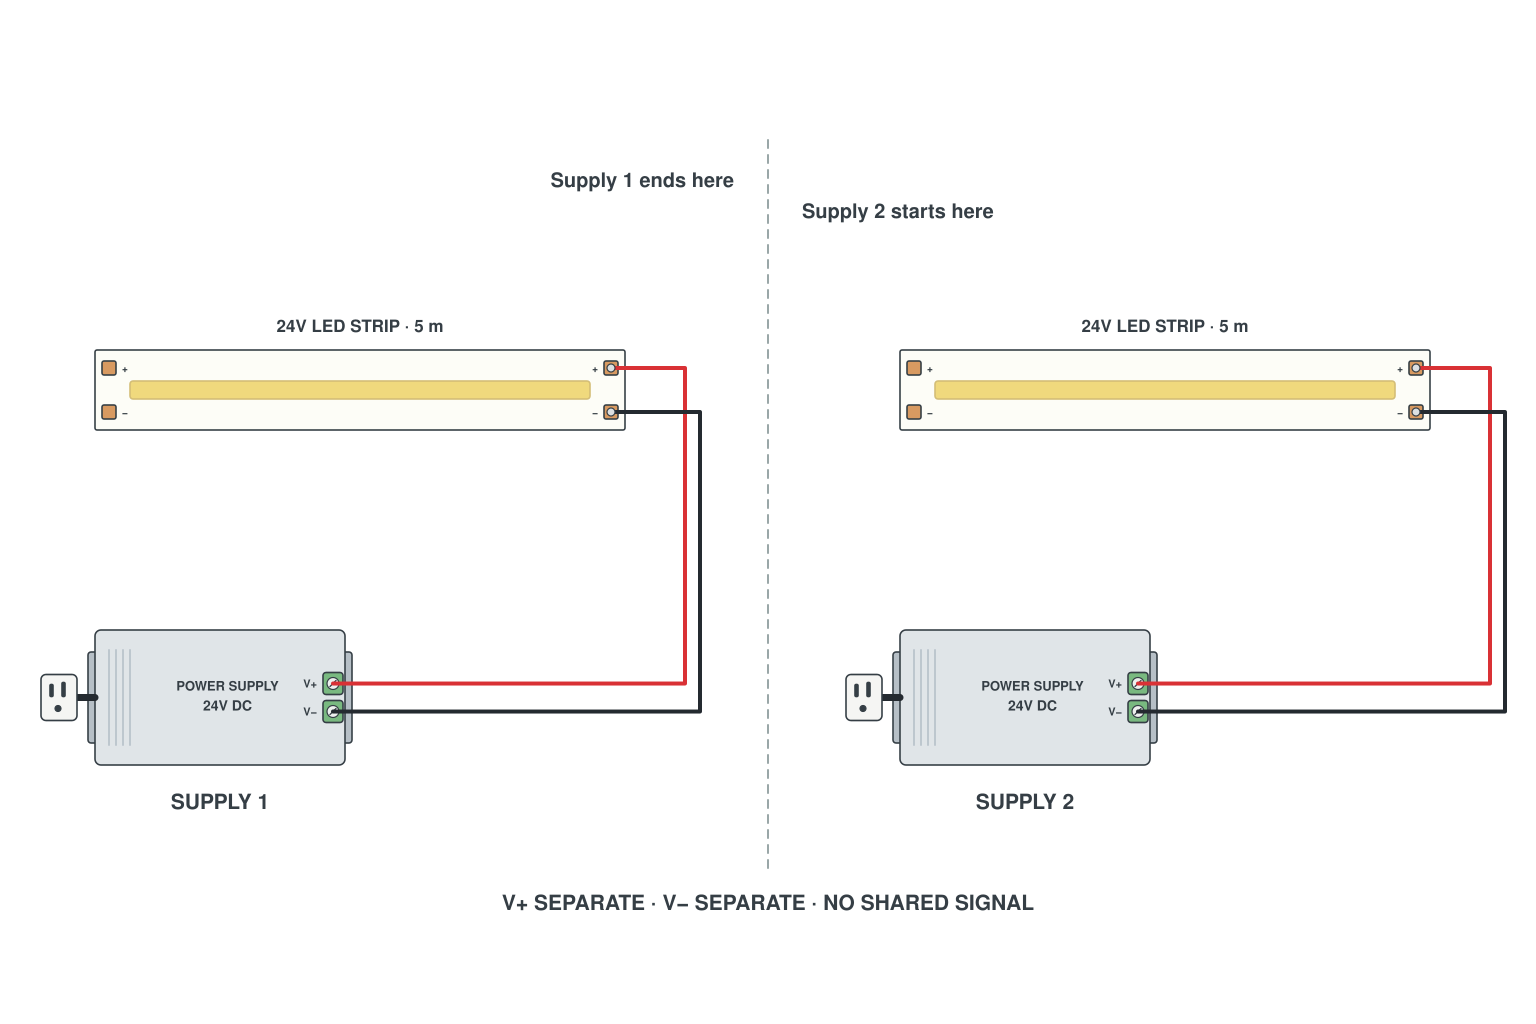
Short on wiring time? A LED light wire splitter cable joins several strips to one supply, an LED light cord extension cable brings the supply closer, and our single color LED strip light kits arrive ready to plug in.
12V vs 24V LED strip wiring
The wiring is the same for both voltages; what changes is how far one feed point reaches. Everything on one circuit must be the same voltage: strip, dimmer and power supply.
| 12V single color LED strip | 24V single color LED strip | |
|---|---|---|
| Current at the same wattage | Twice the current of a 24V strip | Half the current, so half the voltage loss on the strip |
| Fed from one end | Up to 5 meters | Up to 10 meters |
| Fed at both ends | Up to 10 meters | Up to 15 meters |
| Cut mark | Every 3 LEDs | Every 6 LEDs |
| Power supply | A 12V supply only | A 24V supply only |
| Good for | Short runs, boats, campers and anything fed from a battery | Longer runs, whole rooms and coves |
Watch out: match the adapter voltage to the strip: a 24V adapter on a 12V strip burns it out. A 5V strip needs power at both ends at 5 meters. For runs of 20-50 m with a single feed, see ultra-long constant current LED strips.
COB LED strip wiring diagram
A single color COB LED strip wires exactly like any other single color LED strip: two pads, + and -, to the power supply or the dimmer. What is different is the cutting and the connector:
- Cut only at the printed mark, every 25-50 mm.
- Clip a COB connector onto the bare end, or tin the pads and solder wires.
- COB LED strips have the same pads but they are narrower: they need the COB connector even at the same width as an SMD strip.
- Connect to the supply or dimmer as with any single color LED strip. When soldering, use a fine soldering tip and a short contact time.
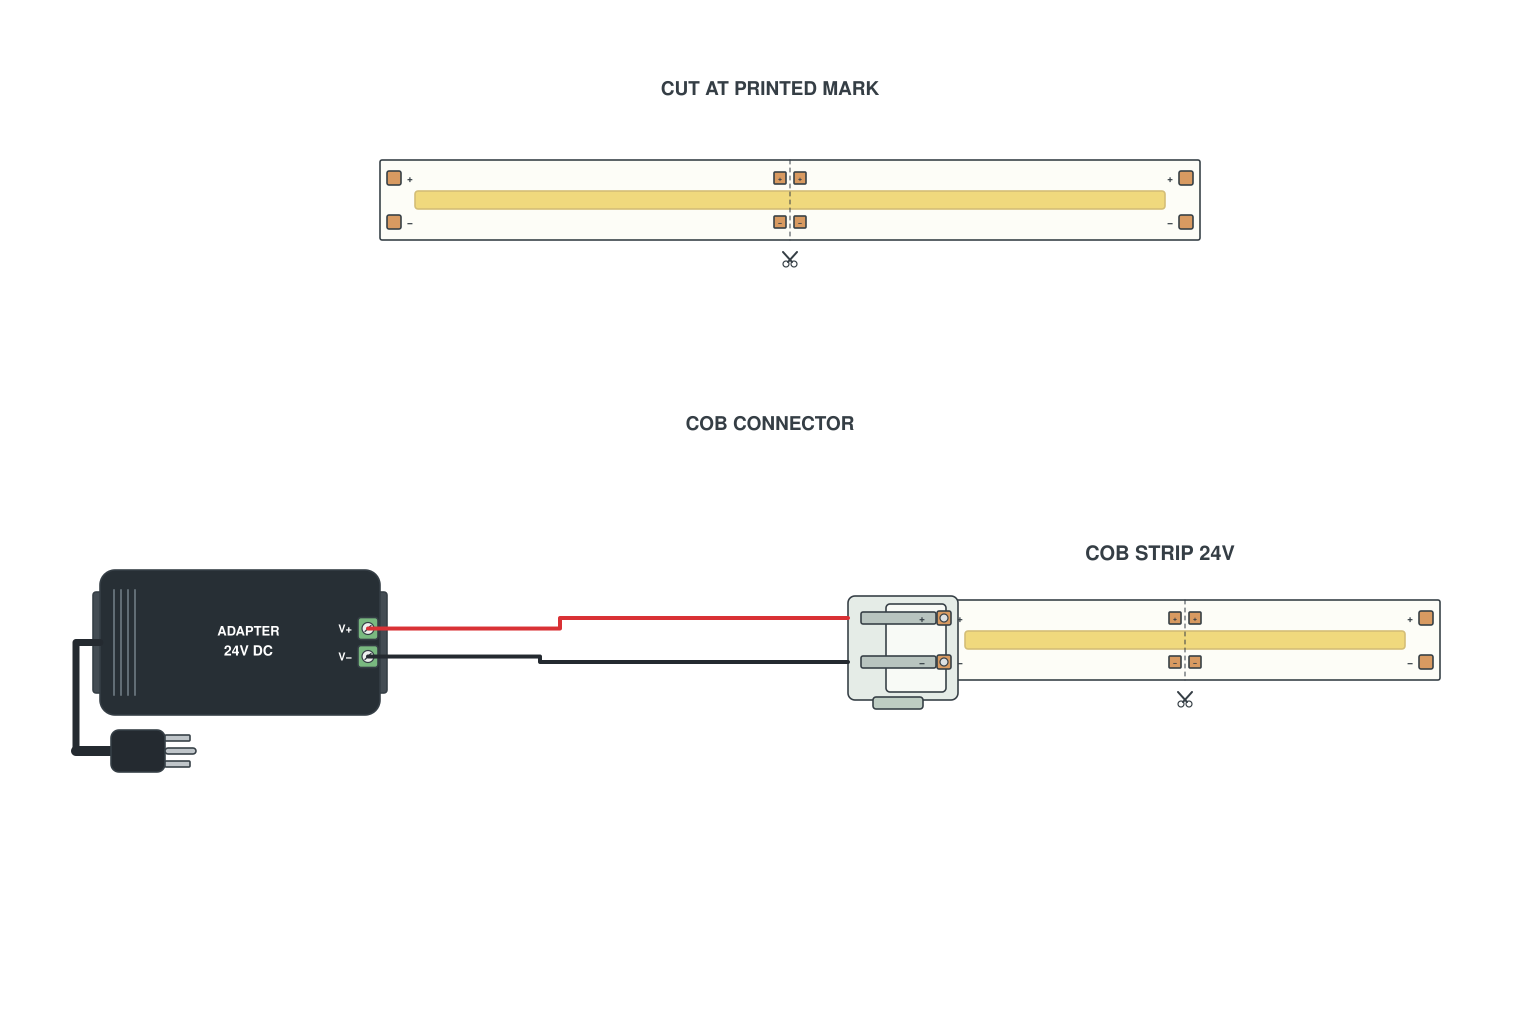
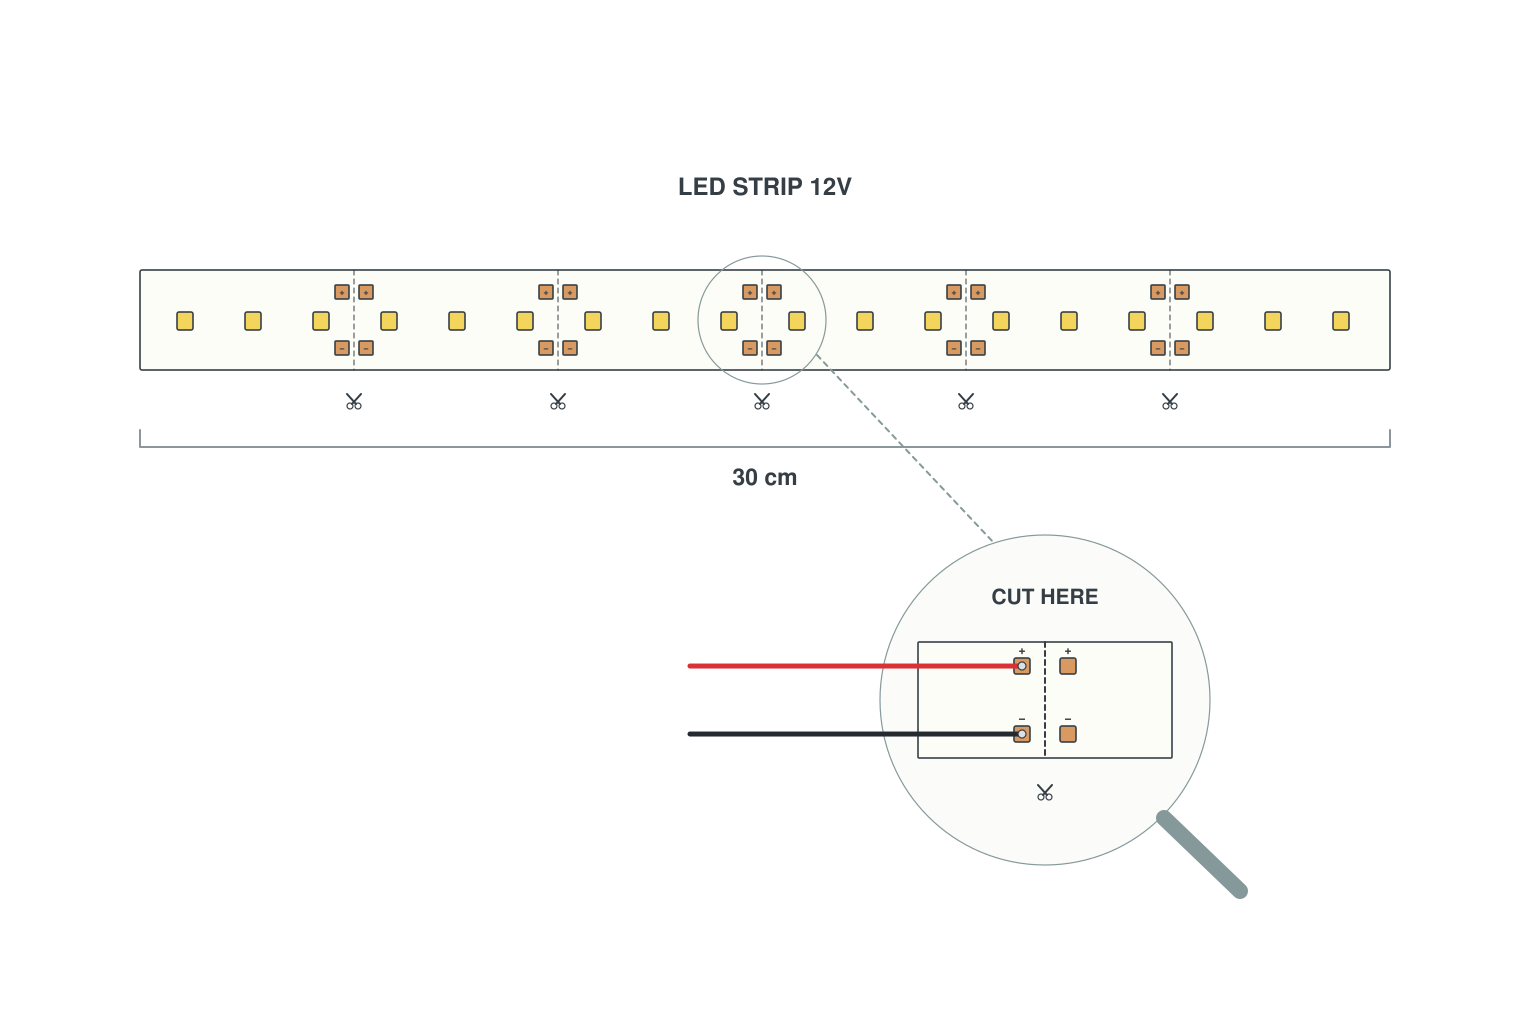
Shop flexible COB LED strip lights (white COB LED strip and non-white single color COB strip) and COB LED strip light connectors.
LED neon rope light wiring diagram
A low voltage LED neon rope light is an LED strip inside a silicone sleeve, so it wires like the strips above. For a neon sign made of several pieces:
- Feed wires exit at the start of each letter or piece.
- Bring every feed to one power supply behind the panel: the letters are wired in parallel.
- Cap and seal the far end of each piece.
- Bend radius minimum 10 cm; never bend it flat-wise.
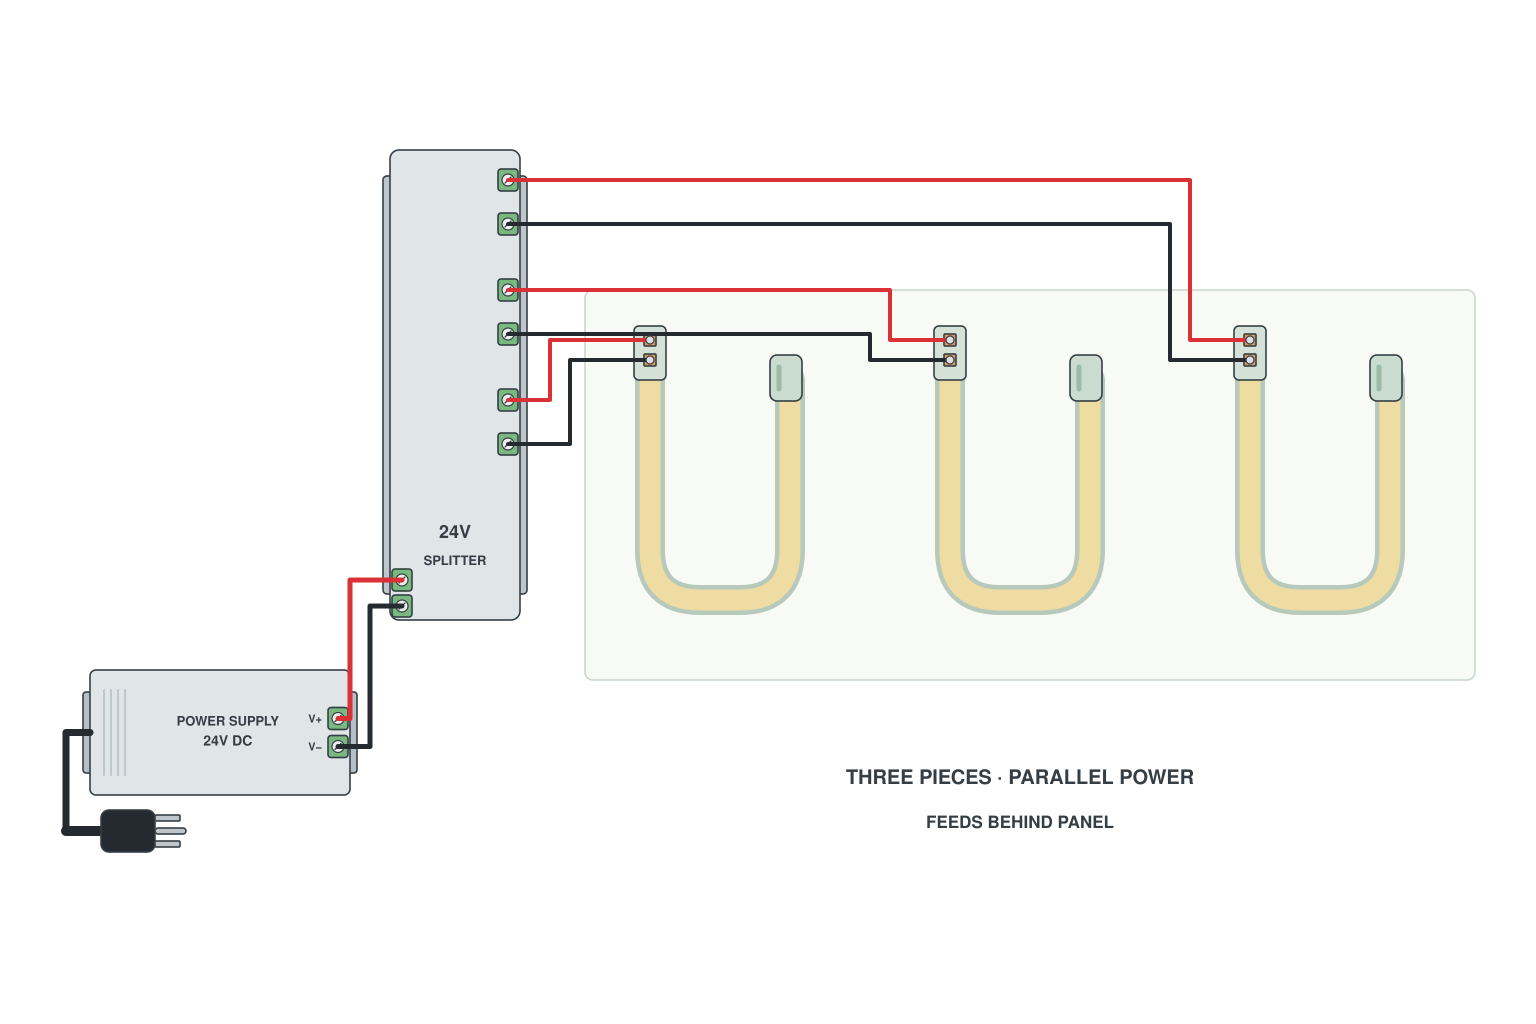
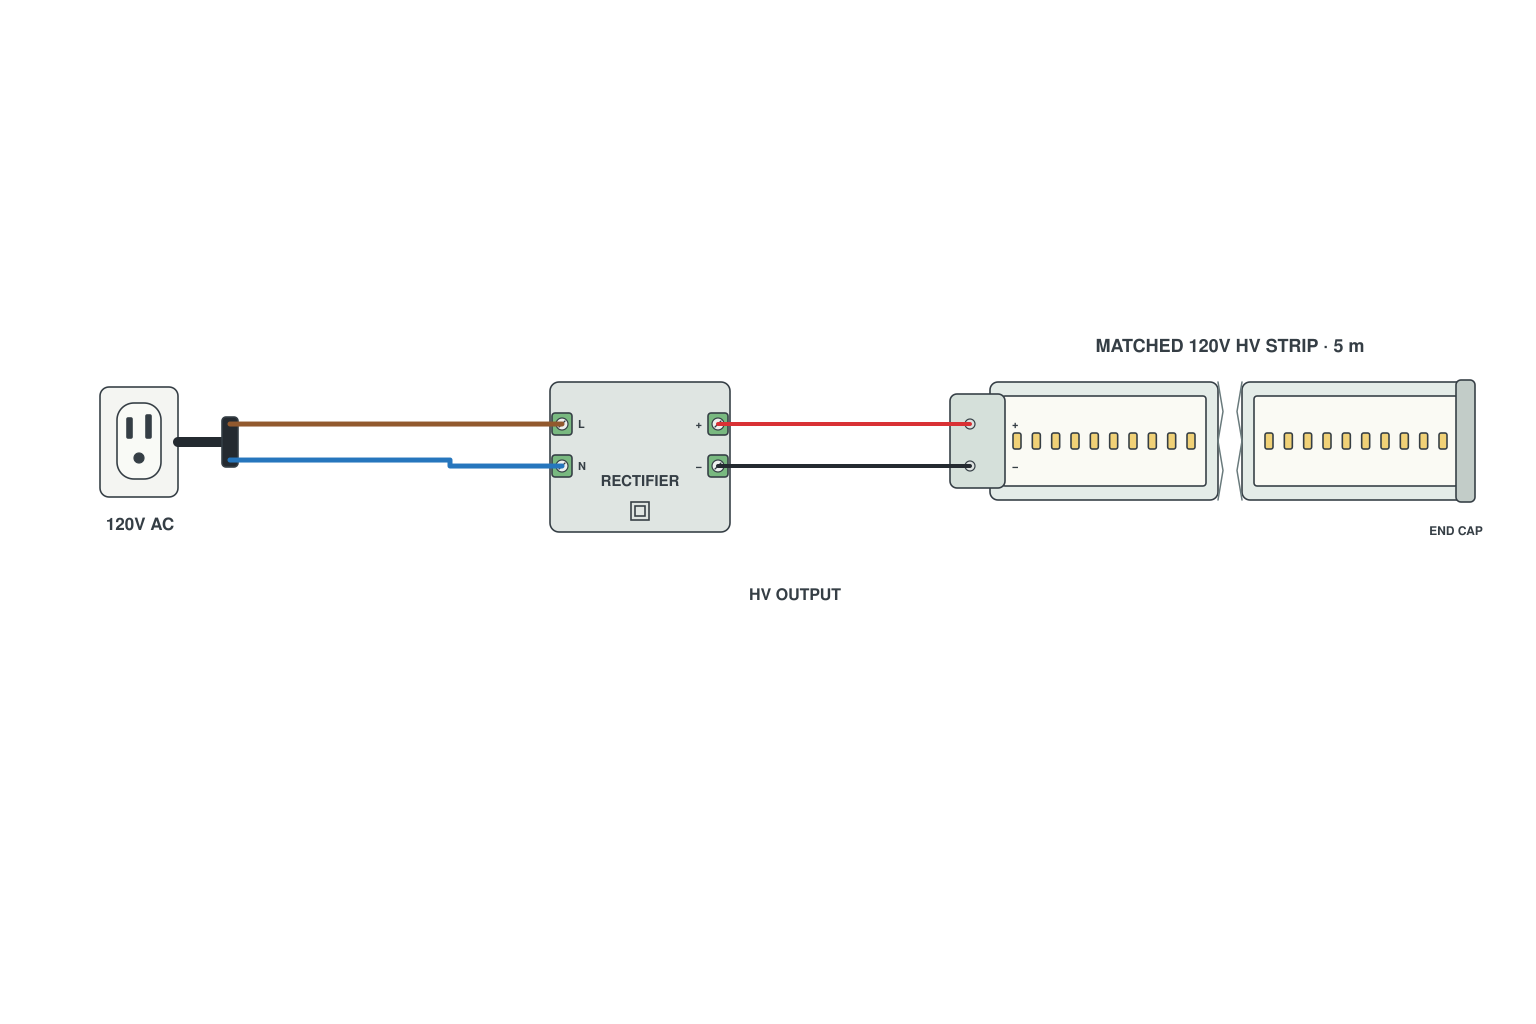
Shop LED neon strip lights, injection molding LED neon rope light and single color LED neon light signs, or AC110/220V LED strip lights.
How to install led light strip?
There are two situations for how to install single color led strip light, the led light controller is not installed and the led controller is installed. The wiring is simple without installing the led light controller. And it is not difficult to install the led controller. Next, let us learn more about how to install led light strip.
1. No LED light controller installed
There are two bare wires at the end of the single color led strip light, one red and one black. Red represents the positive pole, and black represents the negative pole. Some people wonder, can the red wire be connected to the black wire? The answer is of course no. The functions of the red line and the black line are different, which is like connecting a single color led light strip with RGB color changing led strip light.
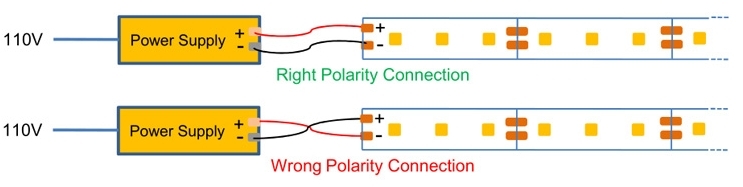
As the 5V led strip lights have a voltage drop of 5 meters, it needs to be powered at both ends when it is connected to the power supply to solve the color and brightness attenuation caused by the voltage drop. The 12V led strip lights and 24V led strips have no voltage drop at 5 meters, so they can be powered at one end.
5V single color led strip lights ⇒ Power supply at both ends of 5 meters 12V single color led strip lights ⇒ Power supply at both ends of 10 meters, power supply at one end of 5 meters 24V single color led strip lights ⇒ Power supply at both ends of 15 meters, power supply at one end of 10 meters |
How to connect multiple single color led strips to the one power supply?
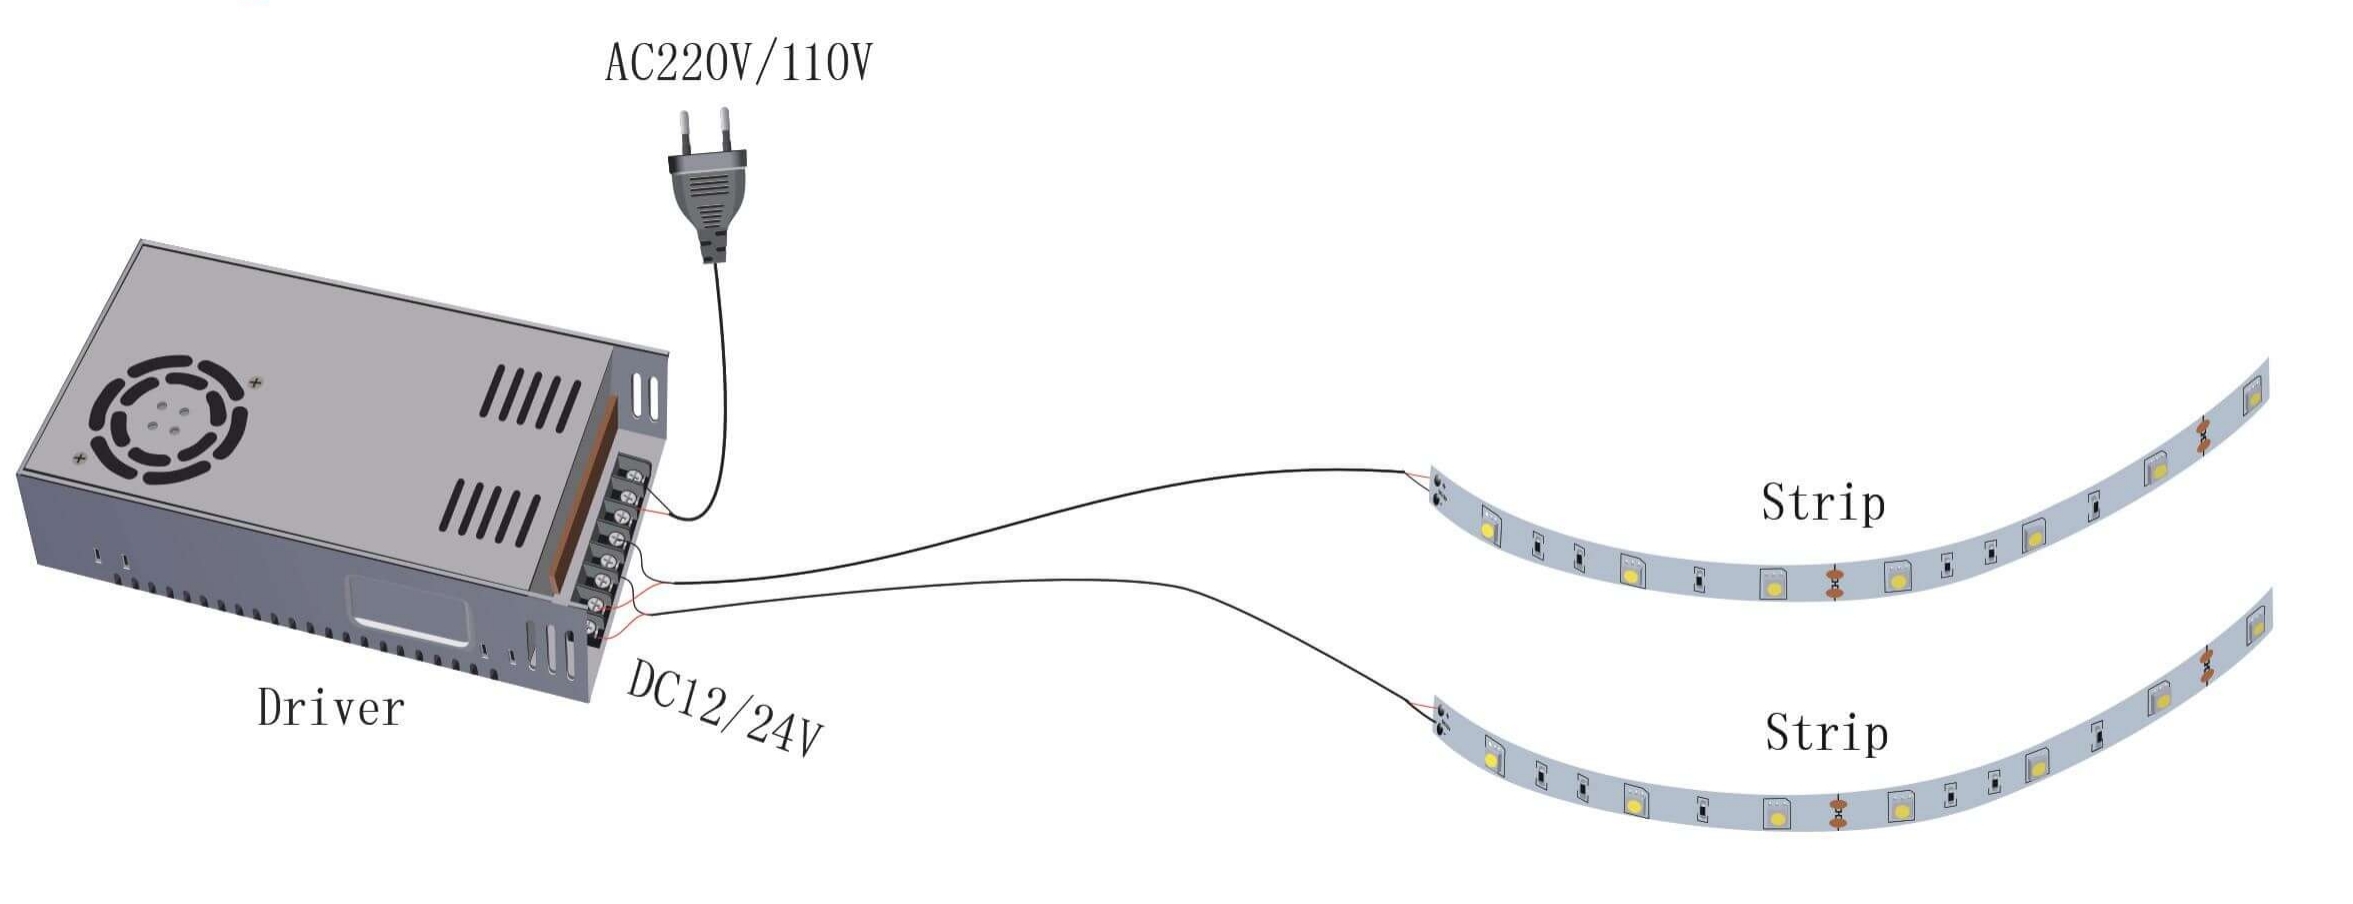
Pay special attention to the voltage drop when connecting multiple single color led light strips. Voltage drop is also a common topic in the process of installing led tape lights. Because the led strip uses low voltage to work, the voltage is consumed, and the end voltage is less than the start voltage, resulting in differences in the color and brightness of the tape light. Therefore, it is not recommended to connect multiple single color led strips in series. However, the maximum connection length of 24V led strip is 10 meters, so two 24V single color led rope lights can be connected and can be powered at one end. The solution to the voltage drop is to bring enough power to the LED lights. We have a separate article on how to calculate the power your rope lights need, hoping to dispel your doubts.
Multiple single color led strip lights can be connected to the same led driver, as long as the power supply can carry enough power required by the multiple led strips. A SMD5050 led strip with 120 LED lights per meter requires 96 watts, and two that 5050 rope lights require 192 watts. Then it needs at least 230 watts of power to carry two such led strip lights because of the rule 80%. After the led driver consumes the required power of the led strips, there should be 20% of the space left to extend the service life.
Related: How to calculate the power for your led strip light?
How to connect led strip to the power supply?
How to connect led strip lights?
The wiring: two reels in parallel from one supply is diagram S2 above; four separate runs from one 24V supply with a fuse on each output is diagram S13. Keep each run within the one-end or both-end lengths in the table.
2. Need to install the LED light controller
The LED dimmer controls the brightness of the single color led strip, and the led driver provides energy for the controller and the led strip. Therefore, the connection sequence is the led strip to the led dimmer and the dimmer to the led power supply.
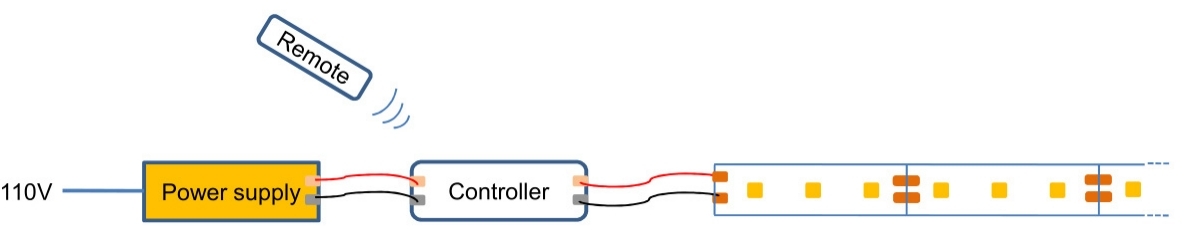
Can one dimmer control multiple single color led strips? Of course, an led dimmer can control two single color led lights like the below wiring diagram. It is worth noting that the power of the led light controller should be the same as the power of the led driver.
Related: How to choose the led strip light controller?
Wiring a dimmer to a single color LED strip
Every single color dimmer sits between the power supply and the strip, or, for a TRIAC system, in the mains line before the driver. These are the four ways to dim a single color LED strip that SuperLightingLED carries:
| Dimming method | How it is wired | Good to know |
|---|---|---|
| PWM dimmer | Supply into the dimmer IN, strip on the dimmer OUT; a knob, touch panel or RF remote sets the level. | Keeps the color temperature constant while dimming. This is what most “LED dimmers” are. |
| TRIAC dimmable driver | A wall TRIAC dimmer in the mains line feeds a TRIAC-dimmable 24V driver; the driver output goes straight to the strip, no extra controller. | Keeps a normal wall dimmer. Match the driver wattage to the strip and check the dimmer minimum load. |
| RF dimmer receivers | Each run gets a small RF dimmer receiver and its own supply, wired like a PWM dimmer; every receiver is paired to the same remote. | Nothing is wired between the receivers; the RF link replaces the signal cable. |
| DMX decoder | A DMX master or console into a 1-channel constant-voltage DMX decoder; 24V supply into the decoder, decoder output to the strip. | One channel = brightness. For several strips use a multi-channel decoder, one channel each. |
Sizing: the dimmer amps must cover the strip current. A 5 m 72 W 24V strip draws 3 A; most dimmers are rated 8-30 A. For more than one strip on one dimmer, add an amplifier (diagram S7) or use RF receivers (diagram S9).
How to wire your large LED strip project?
When there are long led light strips, how to install the light strip? There are two options. One is to choose an ultra-long constant current led strip, which can achieve ultra-long distance without voltage drop and solve wiring troubles. You can operate the constant current led strip light according to the above method without installing the led controller and installing the controller. The second is to hardwire multiple led strips, but complex wiring is required.
Choose which method to use according to your preferences and the actual situation. Now let's talk about the wiring of multiple led strips in detail.
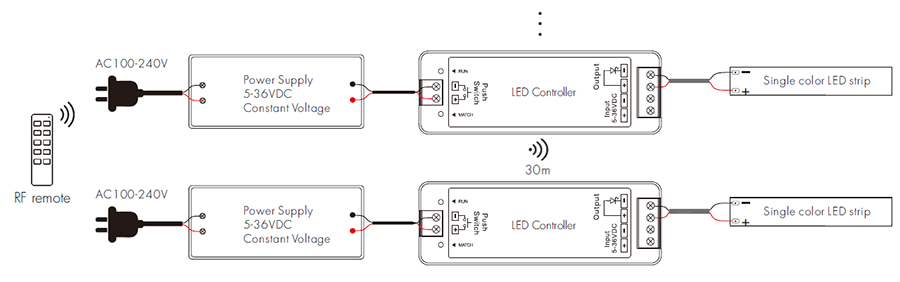
1. Use the RF LED dim controller
Connect a single-color led strip to an RF led controller, and how many such sets are connected depends on your project needs. Then provide power to these RF wireless controllers. These led dim controllers can share a power source or use power sources separately, depending on if there is a voltage drop. To prevent the voltage drop, it is recommended to use the power supply separately.
The RF dim controller can realize automatic synchronization within 30 meters. The led light remote sends out a control signal, and the first led controller that receives the signal will automatically synchronize to the next led light controller and then the next controller is within the effective distance, which is less wiring cost between the led controllers. Although there is an automatic synchronization distance of 30 meters, this distance will be attenuated due to the influence of other strong signal sources like the WIFI router and the microwave at home. The distance between the two RF led dim controllers should be no further apart than 15 meters.
How to set up the RF LED dim controller?
The RF led dim controller supports a variety of control methods, mobile phones, remote control, panel control, Bluetooth, WIFI, and voice assistant. Multiple RF led light controllers can be controlled together or separately. There is a matching button on each led controller to match the remote control. An RF led controller can be paired in different zones of the same remote control to realize flexible grouping function.
How to pair the RF LED light controller?
Step 1. Turn on the RF led controller and the led light remote.
Step 2. Press the matching button of the first RF led controller, and the controller indicator will flash.
Step 3. Press the “1” of the RF remote within 10 seconds.
It means “1” can control the led strip controlled by the first RF led dim controller.
Step 4. Pair the other RF led controllers in the same way.
If you want to control the RF led light controllers at the same time, pair all the led controllers to the “1” of the remote, and of course, it can be “2”, “3”, or “4”. For individual control, match the first RF controller to “1”, the second led controller to “2”, the third to “3”, and the fourth to “4”. In this way, you can control each led light strip individually to get the result you want. It is generally used in multiple zones, which solves the problem of connection between zones.
How to reset the RF led dim controller? Keep pressing the matching button until the indicator light flashes, which means reset successfully.
For controlling the RF led light controllers in the same area together, in fact, there is another simple way to install the led tape light, that is, to use an ultra-long constant current led strip, which saves the cost of using multiple led controllers.
See diagram S9, RF sync for the layout: each run gets its own receiver and supply, and every receiver is paired to the same remote or wall panel. Shop RF DIM CV controllers and the whole RF DIM control system.
2. Use the LED signal amplifier
1) What is an led signal amplifier?
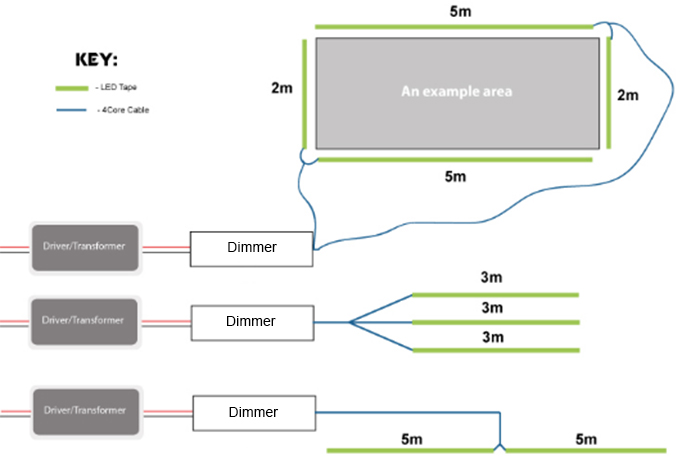
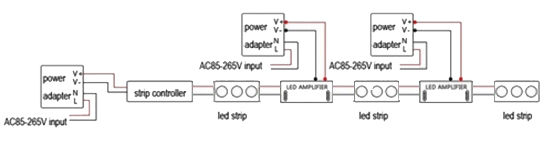
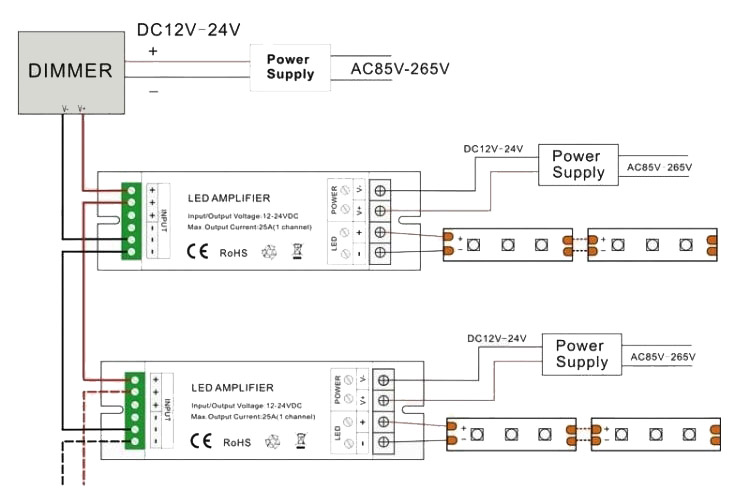
The led signal amplifier is to enhance the weakened signal in the circuit to keep the color and brightness of the subsequent led strip consistent with the previous light strip. With the signal amplifier, you can connect the led light strips in series or in parallel.
• LED amplifier series wiring diagram
• LED amplifier parallel wiring diagram
2) When to use the led amplifier?
For simple led strip projects, no amplifier is needed. When it comes to multiple led strip wiring or you find that your led light is dimmed due to the signal attenuation, the amplifier will work at this time. When the dimmer is overloaded, the power of all the light strips is greater than the power of the dimmer. At this time, an amplifier can be used to divide the light strip into two sections, with an amplifier in the middle.
3) How to use the led amplifier?
The led amplifier is installed behind the led light controller. And the led amplifier amplifies the attenuated signal flowing through the led strip, it is inevitable to connect the light strip. However, without power, the amplifier will not work at all, so it is necessary to connect the led amplifier to the power supply. Simply put, the led amplifier needs to be connected to the led light controller, the led strip, and the led power supply.
The led amplifier power is related to the power of the led strip connected to the amplifier. If the led tape light connected to the led amplifier is 36 watts, the amplifier power must be at least 36 watts.
| LED amplifier power = Current x Voltage |
Series wiring in short: at the end of strip 1, the amplifier IN takes the dimmed signal and its OUT feeds strip 2. The amplifier needs its own power supply input so the current for strip 2 does not pass through strip 1 (diagram S7; several branches from one dimmer: diagram S8). Shop single color LED strip power amplifiers.
3. Use DMX decoder
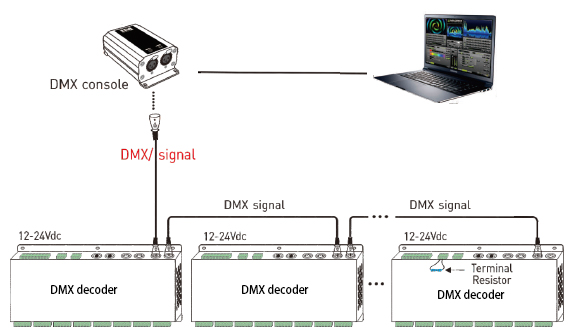
The DMX decoder is compatible with international standard protocols such as DMX512, with constant voltage power supply and PWM constant voltage output, which can be used to control single-color LED lights. One DMX decoder can control multiple single color led strips to solve the complicated problem of led light strip wiring. Generally used for commercial lighting.
The wiring principle of one DMX console to control multiple DMX decoders:

How to wire a single DMX decoder?
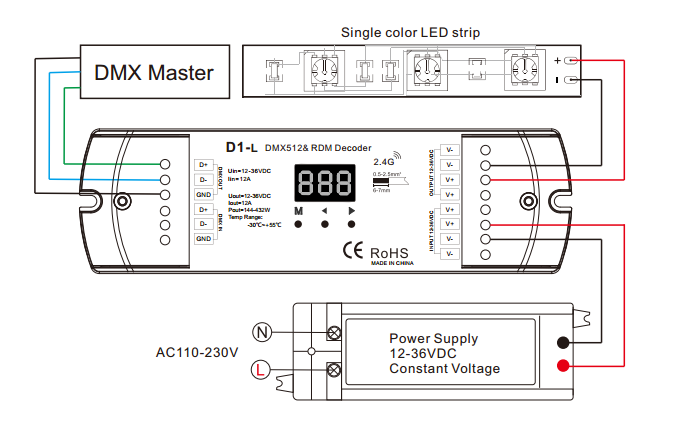
For one single color strip on a DMX system, see diagram P11: set the start address on the decoder display; one channel controls the brightness.
If there are other related led light strip wiring problems, feel free to contact us.
Single color LED strip FAQ
Which wire is positive on a single color LED strip?
The red wire is the positive pole and the black wire is the negative pole. On the strip the two pads are marked + and -. Reversed polarity does no harm, but the strip stays dark.
Should I choose a 12V or a 24V single color LED strip?
At the same wattage a 24V strip draws half the current, so it runs further: from one feed point a 12V strip goes up to 5 meters and a 24V strip up to 10 meters. 12V still makes sense for short runs, boats, campers and anything fed from a battery. Strip, dimmer and power supply must all be the same voltage.
How do I connect several single color LED strips to one power supply?
Wire them in parallel, not in series: run a separate pair of wires from the power supply terminals to the start of each strip, or use a splitter cable. The power supply must carry the total power of all the strips with 20% to spare.
How do I wire a COB LED strip?
Cut only at the printed mark, every 25-50 mm, clip a COB connector onto the bare end or tin the pads and solder wires, then connect it to the power supply or dimmer as with any single color LED strip. COB strips need COB connectors because the pads are narrower.
Can one dimmer control several single color LED strips?
Yes. The dimmer should have the same power rating as the LED driver. When the strips draw more than the dimmer can carry, divide them into sections with an amplifier in between, or give each run its own RF receiver paired to one remote.
Parts for wiring a single color LED strip
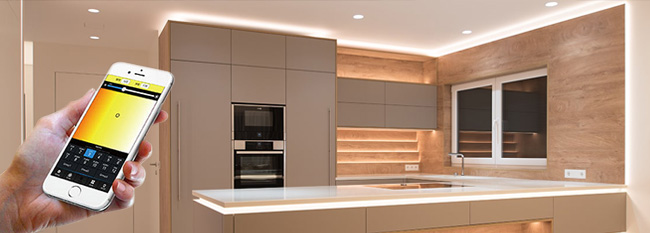 Single color LED strip lights2-pin strips, 12V and 24V
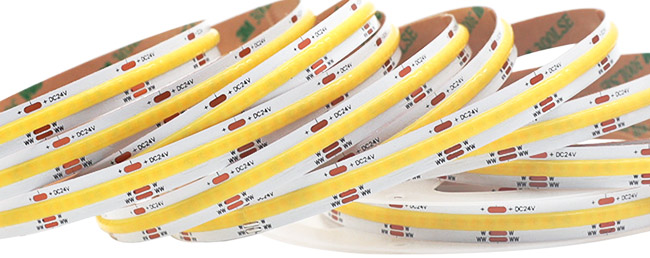 Flexible COB LED strip lightsDotless COB strips
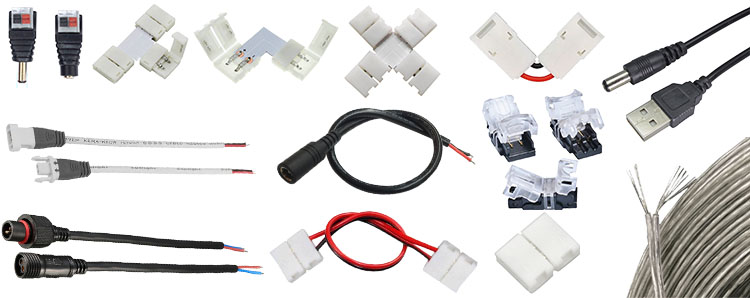 2-pin single color LED strip partsConnectors and cables for 2-pad strips
 COB LED strip light connectorsNarrow-pad COB connectors
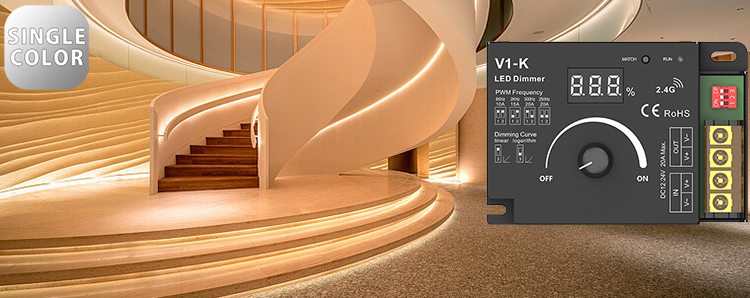 Single color dimmersBetween the supply and the strip
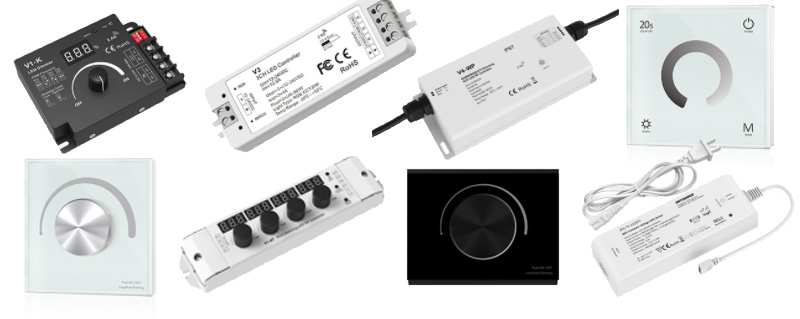 RF DIM control systemReceivers, remotes and panels
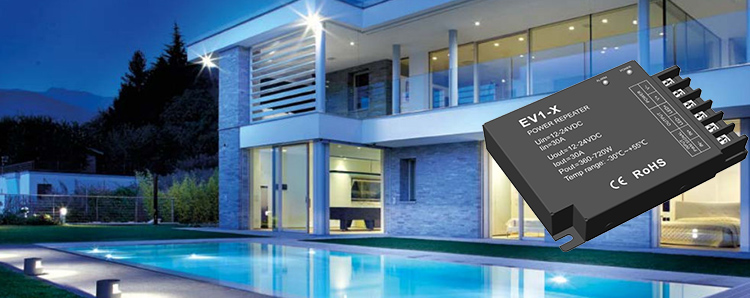 Single color power amplifiersTwo or more strips on one dimmer
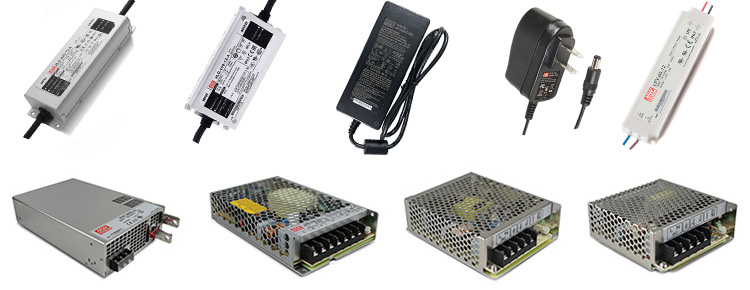 DC12V MW UL-listed power suppliesFor 12V LED strips
 DC24V MW UL-listed power suppliesFor 24V LED strips
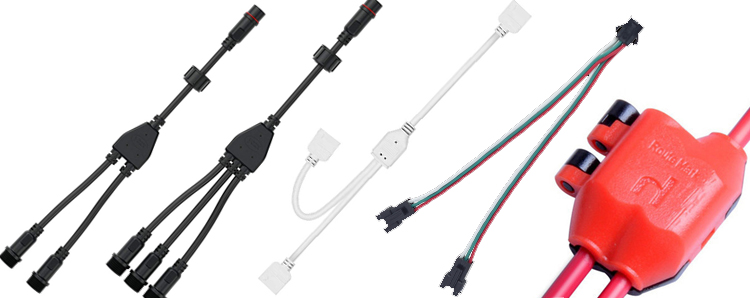 LED light wire splitter cablesOne supply, several strips
Send us the strip model, the lengths and where the power supply can go, and the SuperLightingLED team will match the strip, connectors, dimmer and power supply. Standard orders such as accessories and controllers ship within 24–48 hours; LED strip orders follow the production lead time shown on the product page. Contact our team