LED neon lights are widely used in light decorations. All led strip lights can use silicone led diffuser channels to make led neon lights. How to use led strip light and silicone led profile to make led neon lighting? You can’t miss the following knowledge.
7 Easy Steps to Make LED Neon Light Strips
Silicone led channel plays a role in protecting the led strip PCB board and has a uniform diffusion effect.
The product structure is mainly divided into a light-shielding surface and a diffusion surface. The light refracted by the light source is transmitted through the silicone diffuser so that it can emit light according to the customer’s desire, which is more breakthrough and artistic than the traditional transparent silicone sleeve.
When the led neon rope light is produced, a traction line will be left inside the led neon tube to let the PCB board through the tube conveniently, and then it is sealed, even if an LED light is broken during the later use, you only need to replace the PCB board instead of the whole led neon light.
Most factories use this line to wind and fix the light strip and then pull it out from the end. This is a more traditional and practical method.
It is more suitable for a 1-3 meters long led neon silicone tube. Basically, only one person is required for the operation. Relatively speaking, it is easy and smooth, and there are few surprises!
►Step 1. Prepare an led light strip that can work normally and an led neon tube.
The width of the light strip needs to be the same as the width of the PCB board in the neon silicone tube or the neon tube width is wider than the PCB width.
If the width does not match, they are not a good pair. Be sure to find a good neon silicone tube partner for your light strip.
All led strip lights can wear neon tubes, don’t worry about your RGB color changing light strips or addressable dream color strip lights not being able to use neon tubes.
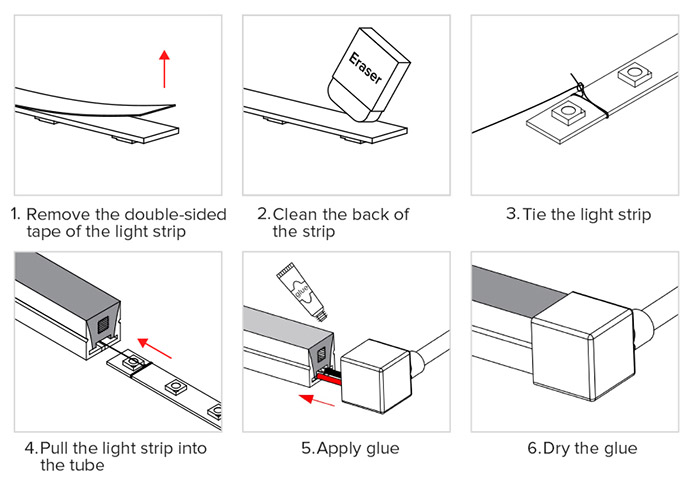
►Step 2. Tear off and remove the adhesive on the light strip.
On the side of the neon silicone tube, there is a translucent line that you can see the cut line of the led strip. If you choose not to tear off the adhesive, you will not see the cut line and you do not know where to cut.
►Step 3. Straighten the neon tube and the light strip.
If it is not flat, it is easy to cause the light strip to bend. In this case, wearing the light strip will cause the sharp edge of the light strip will cut the inner wall of the tube and the light strip cannot be pulled out.
►Step 4. Place the led strip with the light bead direction correctly.
Not all silicone neon tubes have the same internal structure. It includes a light strip channel and a light source channel.
Generally speaking, the shape of the light strip channel is very similar to the shape of the cut surface of the light strip. Carefully distinguish these two channels, it is not difficult to distinguish, I believe you can do a good job.
If your neon tube has only one channel, you need to be careful not to reverse the light-emitting surface of the light strip. And the light-emitting surface is milky white. Once it is anti-loaded, all the operations behind you will fall short.
►Step 5. Tie the traction line from the neon silicone tube to the led strip.
Your operation affects whether the specific part where you tie the line is the PCB board or the end wire of the led strip light.
One of the hidden dangers of tying on the PCB is that during the pulling process, too much violence or the length of the pulling line will cause damage to the PCB board.
If you are not sure whether your operation will damage the light strip, tie the traction line to the wire at the end of the light strip, which will hardly affect the light strip.
►Step 6. At the other end of the silicone neon tube, slowly pull out the traction line with the light strip.
If a person is not easy to operate, you can call your friends for help. Pay attention to your strength in the process of pulling the line to prevent damage to the light strip and the led neon tube or cause the traction line to loosen off.
►Step 7. After passing the led light strip perfectly through the neon silicone tube, untie the traction line, pass the wire at the end of the light strip through the end cap hole, cover the end caps at both ends, and seal it with adhesive.
It is also possible to use heat shrink tubing without adhesive. Of course, you want to use both adhesive and heat shrink tubing, which is obviously great. This greatly enhances the guarantee for your use of neon lights and reduces follow-up maintenance.
As you can see, we have repeatedly mentioned using adhesives to seal the led neon ropes. For all waterproof light strips, whether it is a led neon rope light or an ordinary waterproof led strip light, it is necessary to ensure that water does not enter the connection interface and cause problems that could have been avoided.
This is the way how to wear led neon tubes for light strips under 3 meters, so what about over 3 meters? How to make led neon light when the led strip is more than 3 meters?
Once the traction line in the led neon tube with a longer product length is easily broken during the pulling process, or stuck and cannot be pulled out again. This is also a problem that most factories will encounter.
The key to solving the problem that the led neon silicone tube is too long to wear the led strip light is to use third-party tools— an air gun.
You still need to tie the traction line to the light strip, use the air gun to aim the led neon silicone tube, press the switch, and the high-pressure gas will follow the silicone tube to rush the light strip and the traction line to the end. You only need to hold the rope and pull it.
Even 5-10m, and 10-30m can be operated according to this method, under the condition that the PCB strip light board and the led neon silicone tube are straight.
Because the strong air pressure will push the light strip forward, the use of air pressure can solve the problem that the led neon silicone tube is too long to wear the light strip.
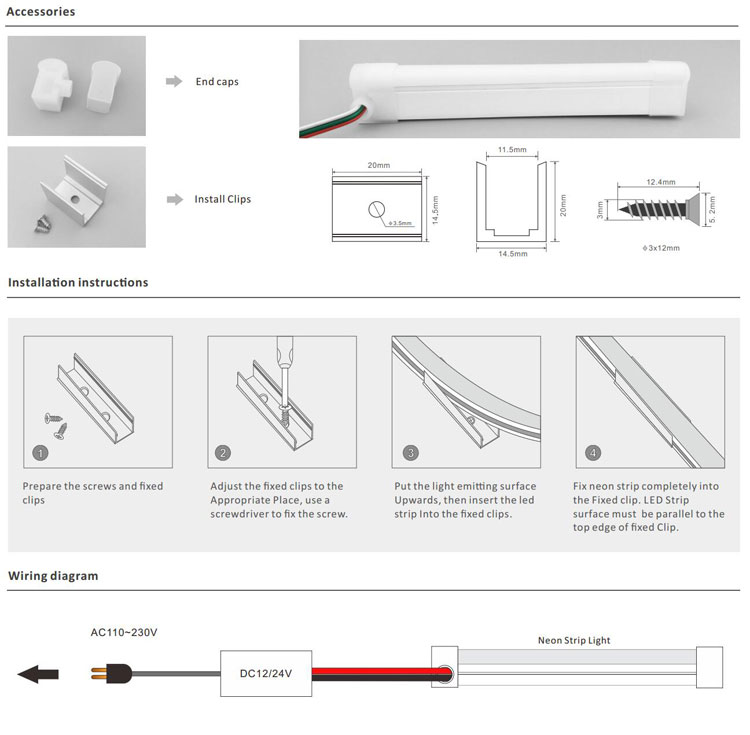
Installing led neon rope lights
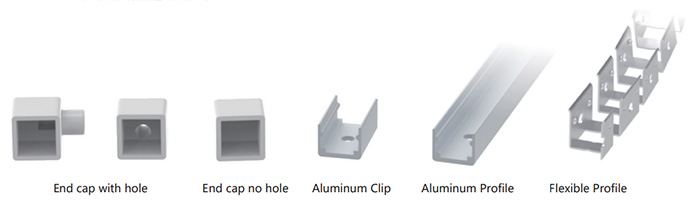
LED neon rope is fixed by aluminum clips. And you can also choose the aluminum profile and flexible profile to install led neon lights.
Both ends of the led neon rope light need to be covered with end caps to protect the light strip inside from external force. The end cap which connects to the power supply or the controller has a hole to allow the wire to pass through.
►Step 1. Prepare the screws and fixed clips.
►Step 2. Adjust the fixed clips to the appropriate place, use a screwdriver to fix the screw.
►Step 3. Put the light-emitting surface upwards then insert the led neon rope into the fixed clips.